 Boats For Sale:


'81 BFN Composite Rebuild |
Post Reply 
|
Page 12> |
| Author | |
Riley 
Grand Poobah 
Joined: January-19-2004 Location: Portland, ME Status: Offline Points: 7946 |
 Post Options Post Options
") Thanks(0) Thanks(0)
 Quote Reply Quote Reply
 Topic: '81 BFN Composite Rebuild Topic: '81 BFN Composite RebuildPosted: October-05-2018 at 11:51am |
|
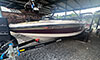
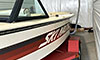
We bought this boat 3 years ago and picked it up in NC for the White Lake Reunion. It is a pretty original boat that was in reasonably good condition and fit our plan for a very usable driver that we would clean up a bit and upgrade the engine with some modifications.
Originally, we planned repairs to the stringers and floor system, but we did not want to rebuild the boat. The stringers were solid up to the front bulkhead where they turned to mush, the longitudinal stringers were mush and the secondary stingers were mush. We had a pretty good patch job planned, but after much discussion, decided to rip everything out and do a Coosa rebuild. We are probably half way through the project. David has done almost all of the glass work. It is definitely young man's work that requires an incredible amount of patience.         |
|
 |
|
|
Gary S
Grand Poobah

Joined: November-30-2006 Location: Illinois Status: Offline Points: 14096 |
Post Options
Thanks(0)
Quote Reply
Posted: October-05-2018 at 12:02pm |
|
Snow comes early in Maine
|
|
|
|
|
DHart
Senior Member 

Joined: August-04-2011 Location: Maine Status: Offline Points: 239 |
Post Options
Thanks(0)
Quote Reply
Posted: October-05-2018 at 12:46pm |
|
I think its worth adding a few more details here as we would not have ended up with this boat without Correct Craft Fan and owe a big thanks to being tipped off that it was going up for sale. We certainly would not be rebuilding this boat from the hull up without Correct Craft Fan, the excellent documentation on the site from previous builds, and plenty of help along the way by people who have done this before. Structure design and layup is largely based on a ’79 BFN. In fact the work on this ’81 is nearly following an instruction book as opposed to the thinking and design work that went into previous builds.
As Dad mentioned, the boat was in decent condition. ‘Secondary stringers’ which are really just bilge framing needed attention. I thought the hull was in remarkably good shape and even liked the slightly weathered look of the graphics. No doubt with a buff job it would clean up well. The plan was patch up the floor, clean up the exterior, make a few engine mods, and go skiing. As many people know, once you start digging that plan can be change. It did take some convincing by others to do a full rebuild even though this boat could have kept going for years to come. It took even more convincing to do a coosa rebuild instead of wood (Looking back, Im not sure why). I couldn’t be happier that we ended up going in this direction and am hopeful with some focus this off season the boat will be in the water for the summer of 2019. Ill post pictures over the next few days and catch up the thread to where we are at now. Its been challenging enough to find time to work on the boat let alone document and keep a thread up to date, but it’s the least we can do considering all of the help and resources that have come from this site. |
|
|
|
|
DHart
Senior Member
Joined: August-04-2011 Location: Maine Status: Offline Points: 239 |
Post Options
Thanks(0)
Quote Reply
Posted: October-05-2018 at 2:31pm |
|
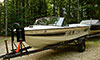
The order of events wasnt ideal as we had in our minds patching for a while. After the engine was pulled, I wet sanded the dash and buffed the boat.
   Then started to take stuff apart  Didnt make too much progress from here before deciding to do a full rebuild. The boat was moved to my oversided shed thats supposedly a garage, taken off the trailer, and anchored securely into the garage  The boat is supported by 4 chine supports (2 on each side) and blocked in 4 different locations on the keel all pretty evenly spaced. 
|
|
|
|
|
DHart
Senior Member
Joined: August-04-2011 Location: Maine Status: Offline Points: 239 |
Post Options
Thanks(0)
Quote Reply
Posted: October-05-2018 at 2:37pm |
|
This is where the dissabembly started to get fun, although not nearly as fun as the grinding that would follow.
  |
|
|
|
|
DHart
Senior Member
Joined: August-04-2011 Location: Maine Status: Offline Points: 239 |
Post Options
Thanks(0)
Quote Reply
Posted: October-05-2018 at 3:08pm |
|
Once the hull was down to the top layer of hull glass, it was time to grind. This picture sort of shows a layup defect which impacted the port side hull bottom, hull side, and transom. The top layer of glass was not adhered well so all of that was peeled up and replaced with biax.
 I added an a couple layers of cloth and layer of biax on the keel as there were a few holes after removing the keel board and glass.  Biax installed on the port side. This was sort of rewarding as it was the turning point to reassembling. 
|
|
|
|
|
storm34
Grand Poobah

Joined: November-03-2008 Location: Dexter Iowa Status: Offline Points: 4492 |
Post Options
Thanks(1)
Quote Reply
Posted: October-05-2018 at 4:25pm |
|
Looks great guys!
|
|
|
|
|
TRBenj
Grand Poobah

Joined: June-29-2005 Location: NWCT Status: Offline Points: 21109 |
Post Options
Thanks(0)
Quote Reply
Posted: October-05-2018 at 5:22pm |
|
Can’t wait for 2020 when it launches.
|
|
|
|
|
8122pbrainard
Grand Poobah

Joined: September-14-2006 Location: Three Lakes Wi. Status: Offline Points: 41040 |
Post Options
Thanks(0)
Quote Reply
Posted: October-05-2018 at 6:00pm |

|
|
|
|
|
DHart
Senior Member
Joined: August-04-2011 Location: Maine Status: Offline Points: 239 |
Post Options
Thanks(0)
Quote Reply
Posted: October-05-2018 at 7:01pm |
2020! In that case you wont get behind the wheel until 2030, SAD |
|
|
|
|
TRBenj
Grand Poobah
Joined: June-29-2005 Location: NWCT Status: Offline Points: 21109 |
Post Options
Thanks(0)
Quote Reply
Posted: October-05-2018 at 7:27pm |
|
And here I was being optimistic...
|
|
|
|
|
Hollywood
Moderator Group 

Joined: February-04-2004 Location: Twin Lakes, WI Status: Offline Points: 13510 |
Post Options
Thanks(0)
Quote Reply
Posted: October-05-2018 at 7:37pm |
|
Just a couple strips of duct tape away as is from launchable.
|
|
|
|
|
8122pbrainard
Grand Poobah
Joined: September-14-2006 Location: Three Lakes Wi. Status: Offline Points: 41040 |
Post Options
Thanks(0)
Quote Reply
Posted: October-05-2018 at 8:51pm |
Phil has a better idea 
|
|
|
|
|
SNobsessed
Grand Poobah
Joined: October-21-2007 Location: IA Status: Offline Points: 7102 |
Post Options
Thanks(0)
Quote Reply
Posted: October-05-2018 at 8:53pm |
|
No duct tape - Flex seal is the way to go.
That will be a lifetime boat! |
|
|
“Beer is proof that God loves us and wants us to be happy.”
Ben Franklin |
|
|
|
|
DHart
Senior Member
Joined: August-04-2011 Location: Maine Status: Offline Points: 239 |
Post Options
Thanks(0)
Quote Reply
Posted: October-05-2018 at 9:51pm |
|
The entire boat is constructed from Coosa Bluewater 26. Hamilton Marine is a local dealer and stock all different dimensions. We settled on 1/2" sheets and a combination of 4'x8' and bought one 5'x12' for stringer construction so we could run 12' stringers without having joints.
Stringers are 1.5" wide and were rough cut, laminated together using cloth and epoxy with milled fiber added for extra strength, then scribed to the hull. The keel board is also 1.5" and laminated using the same method. I studied my '88BFN pretty closely and noticed the rear motor mounts have one shim under them and the fronts have 3. The primary stringers are about 1/2" taller compared to the '88 stringers with the intent of eliminating one shim from the front and back. Maybe 2 from the front if possible.  All structural pieces that we chose to bed were bedded with milled fiber thickened epoxy. Primary stringers and the keel board received fillets then a 2", 4", 8" cloth layup, followed by biax and a biax topper.  Secondaries were bedded, filleted, then 2", 4", 8" cloth and biax - no topper.   Stringers were scalloped at the motor mounts because I'm using an engine cradle from an '86 BFN. The cradle will be through bolted to the stringers, and the engine will be bolted through the top of the cradle. Tim had a great suggestion for finishing the bilge and that was to tint the epoxy. I bought a quart of gray epoxy tint (mixing ratio is 40z of tint per gallon of epoxy). The tinted epoxy was used for the final biax layer in the bilge. Once all of the construction is done, ill sand and fill as needed and brush on a final coat. 
|
|
|
|
|
DHart
Senior Member
Joined: August-04-2011 Location: Maine Status: Offline Points: 239 |
Post Options
Thanks(0)
Quote Reply
Posted: October-06-2018 at 11:02am |
|
After the secondaries were glassed, we started in on the ribs. This build will not have any foam other than in the airbox. Like Tim's build, ribs and bulkheads are spaced roughly every 12". The floor glass was cut back almost all the way but ~1" remained on each side as a floor height reference. Once the floor height was established by the ribs, the remaining glass was pulled from the hull sides and more grinding took place.
 The layup defect pictured earlier continued up the port hull side. The really light pinkish glass mid picture is the top layer of hull glass peeling up. Transom to bow, the glass was pried and ground out. This giant back board was removed (major pita) and will not be reinstalled.  Here is the port side after biax was replaced on the hull side and ribs installed using 2", 4", and 8" cloth. None of the ribs were bedded other than the rib closest to the transom. 
|
|
|
|
|
Gary S
Grand Poobah
Joined: November-30-2006 Location: Illinois Status: Offline Points: 14096 |
Post Options
Thanks(0)
Quote Reply
Posted: October-06-2018 at 11:54am |
|
Dave,Tim or Joe just curious when working with Coosa do all the edges have to be sealed? Like in Dave's picture below I realize like when bonding the ribs in, either to the hull,floor or stringer you are enclosing it's edge. But where the ribs are cut out for draining,circled below,does that cut edge need to be covered ?
Beautiful work as usual Dave. Seems a shame to cover up. 
|
|
|
|
|
DHart
Senior Member
Joined: August-04-2011 Location: Maine Status: Offline Points: 239 |
Post Options
Thanks(0)
Quote Reply
Posted: October-06-2018 at 12:23pm |
|
Good question Gary. I think the answer is no, but will let one of the experts confirm. Coosa shouldn't absorb water so even if it gets wet, there shouldn't be an issue.
Although if I'm wrong, the floor isn't installed yet so I can get in there with epoxy and a brush and seal that up. |
|
|
|
|
samudj01
Gold Member

Joined: March-10-2009 Location: NC Status: Offline Points: 933 |
Post Options
Thanks(0)
Quote Reply
Posted: October-07-2018 at 10:00am |
|
Nice looking work guys! Looking forward to following this and seeing that bad boy for a second time at white lake in April. Gotta have a goal! Would you give more detail on your layup schedule. I get the 2,4,8. How may layers of biax, what size and what thickness or kind of biax?
|
|
|
78 Ski Tique, 72 Skier w/302's, 93 SN w/351 & 17 GS22 w/zr409
Previous - 99 Sport Nautique w/GT40 and 87 Martinique w/351 |
|
|
|
|
Lakeview
Senior Member
Joined: January-06-2004 Location: Branchville NJ Status: Offline Points: 247 |
Post Options
Thanks(0)
Quote Reply
Posted: October-07-2018 at 10:15am |
|
Very ambitious project-your work and patience shows-Good Luck!!!
|
|
|
Lakeview
1992 Barefoot Nautique 1967 Barracuda SS 1967 Chris Craft Cavalier |
|
|
|
|
DHart
Senior Member
Joined: August-04-2011 Location: Maine Status: Offline Points: 239 |
Post Options
Thanks(0)
Quote Reply
Posted: October-07-2018 at 11:15pm |
I detailed the layup schedule below. This was nearly an exact copy from Tim's '79 thread. There will likely be small differences in how I handle the bulkheads only becuase my stringers are 12' long and some bulkheads will span both the stringers and the keel board. Ill detail that when I get there. Unfortunatley that work hasnt been done yet so Im nearing the end of my rapid fire updates until I go get some more work done. The biax is US Composites DBM 1708 (actual part number ordered was FG-170812R). Right from the US Composites web site: "DBM 1708 Contains double bias(17oz) stitched at 45degrees along with one layer of 3/4oz mat. Thickness: 0.044" " This stuff is thirsty. For reference, when I replaced the top layer of hull glass with biax on the port hull side (only the side, not side + bottom), I used a full gallon of epoxy. Primary stringers: - bedded with milled fiber thickened epoxy - fillet, then 1 layer of 2", 4", 8" cloth, 1 layer of biax on each side, then a biax wrap over the top of the stringer Secondary stringers - bedded with milled fiber thickened epoxy - fillet, then 1 layer of 2", 4", 8" cloth, and 1 layer of biax on each side (not wrapped over the top) Ribs: - rib nearest the transom was bedded, fillet, then 1 layer each of 2", 4", and 8" cloth - all other ribs were installed with 1 layer of 2", 4", 8" cloth Bulkheads: -ill detail this when I get there and will be sure to come back and update this post. |
|
|
|
|
DHart
Senior Member
Joined: August-04-2011 Location: Maine Status: Offline Points: 239 |
Post Options
Thanks(0)
Quote Reply
Posted: October-07-2018 at 11:48pm |
|
Once the ribs were installed, my next move was working on the transom. I made a new lifting ring backer board that should look quite familar.
  I filled the recessesd bolt holes with milled fiber thickened epoxy and put one peice of cloth over them for good measure. Once that dried, I gave it a quick sanding and installed.  This backer board was bedded, 2" cloth on all edges, 4" cloth on all edges, then 1 layer of biax.  I Installed the backer boards for the platform brackets, exhaust, bilge/fresh water flush, and fuel overflow. Platform brackets were glassed in with 1 layer of cloth and biax, the other backers just biax. I filled the pitot tube holes as those will not be reinstalled. We will eventually do GPS conversions on the 725s, so no need for those.  Next, I finished off the strut and rudder port backer boards, Then the backer for the fins, pylon cup and bilge pump. Those were all glassed over with biax. Once the construction is complete, Ill go back to sand, fill, and put one final coat of epoxy in the bilge.   Next up, which I hope to chip away at this week, is installing all of the bulkheads that are cut, and covered in cloth. |
|
|
|
|
MrMcD
Grand Poobah

Joined: January-28-2014 Location: Folsom, CA Status: Offline Points: 3590 |
Post Options
Thanks(0)
Quote Reply
Posted: October-08-2018 at 1:29am |
|
You guys have done a ton of nice work, that will be a very solid boat to build on.
Mark |
|
|
|
|
Donald80SN
Grand Poobah
Joined: January-12-2009 Location: Denver, NC Status: Offline Points: 3887 |
Post Options
Thanks(0)
Quote Reply
Posted: October-08-2018 at 11:49am |
|
Nice work. It will outlast everyone on this site.
|
|
|
1980 Ski Nautique SOLD Back to Cypress Gardens
2002 Sport Nautique, GT-40, FCT2, Cover Sports, Tower Bimini, Inc., Wet Sounds Audio System, Star Gazer Wake Edition S. 1968 Ski Nautique, Project. |
|
|
|
|
Riley
Grand Poobah
Joined: January-19-2004 Location: Portland, ME Status: Offline Points: 7946 |
Post Options
Thanks(0)
Quote Reply
Posted: December-12-2018 at 10:04am |
|
Dave keeps toiling away at the glass work. He's made lot of progress during the past 2 months.
  First time out of the garage in more than a year to go back on the trailer for the engine test fit. 
|
|
|
|
|
TRBenj
Grand Poobah
Joined: June-29-2005 Location: NWCT Status: Offline Points: 21109 |
Post Options
Thanks(0)
Quote Reply
Posted: December-12-2018 at 10:09am |
|
You guys should check out the classic correct craft fb page, Bucky j’s is documenting a composite Bfn rebuild there- you can probably learn a few things from it.
|
|
|
|
|
DHart
Senior Member
Joined: August-04-2011 Location: Maine Status: Offline Points: 239 |
Post Options
Thanks(0)
Quote Reply
Posted: January-29-2019 at 10:36pm |
|
We are continuing to chip away and make some progress. Since the last update, the conduit was installed, floor bedded, glassed, sanded, and safe to say complete. We also spent some time test fitting the engine to nail down placement with the cradle and verified there wont be any surprises.
The bilge was painted with 2 coats of tinted epoxy. I used US Composites Gunsmoke Grey and am very happy with the results. I need to do a little more sanding and fairing but will be ready to call it complete and move on soon.  Drain holes were cut in the secondary pockets and primaries towards the transom, but not shown in this picture  This 2.5" pneumatic sander was a life saver when it came to sanding the tight spots especially between the primary and secondary stringers. Only $27.99 at Harbor Freight, but it did require a good sized compressor.  Flipping through some pictures of other bfn builds, I noticed quite of bit of extra room that looked like opportunity to increase the fuel tank size. Being on a bigger lake and hoping to use this boat in some barefoot racing, increasing fuel capacity seemed like a good idea.  It turns out there is a local company called Triple M Plastic Products about 30 minutes from us. They do all sorts of custom PVC, ABS, and polyethylene welding and they've been making boat tanks for a long time. We came up with a design that was relatively simple minimizing welds, leaving enough room for the blower vent, and bumped the capacity up to about 40 gallons from the factory 27. Hopefully we see the new tank in the next couple weeks and Ill be sure to post some pictures. Its been pretty exciting lately as it feels like we are slowly approaching some of the finish work. I'm looking forward to drilling some holes and attaching transom hardware this weekend. The only finish work last weekend was cleaning up the gray pedestal and attaching it to the beautifully upholstered drivers seat. The skins came from our friends at Christine's.  
|
|
|
|
|
samudj01
Gold Member
Joined: March-10-2009 Location: NC Status: Offline Points: 933 |
Post Options
Thanks(0)
Quote Reply
Posted: January-30-2019 at 12:40am |
|
Looking nice!!!
|
|
|
78 Ski Tique, 72 Skier w/302's, 93 SN w/351 & 17 GS22 w/zr409
Previous - 99 Sport Nautique w/GT40 and 87 Martinique w/351 |
|
|
|
|
Jonny Quest
Grand Poobah

Joined: August-20-2013 Location: Utah--via Texas Status: Offline Points: 2841 |
Post Options
Thanks(0)
Quote Reply
Posted: January-30-2019 at 12:56am |
|
Outstanding work. I'm anxious to see the finished product.
JQ |
|
|
Current
2003 Ski Nautique 206 Limited Previous 2001 Ski Nautique Open Bow 1994 Ski Nautique Open Bow Aqua skiing, ergo sum |
|
|
|
|
storm34
Grand Poobah
Joined: November-03-2008 Location: Dexter Iowa Status: Offline Points: 4492 |
Post Options
Thanks(0)
Quote Reply
Posted: January-30-2019 at 1:45am |
|
Dave, looks great! In the process of placing an order for new skins from C&S (Christine's). Planning to build new bases, order new foam/skins from Christine's and install them myself.
Assuming you ordered after they changed over to C&S - any chance you can elaborate on your experience with Christine's? |
|
|
|
|
Post Reply
|
Page 12> |
 Tweet
Tweet
|
| Forum Jump | Forum Permissions You cannot post new topics in this forum You cannot reply to topics in this forum You cannot delete your posts in this forum You cannot edit your posts in this forum You cannot create polls in this forum You cannot vote in polls in this forum |


 Topic Options
 TRBenj wrote: