 Boats For Sale:


2017 Stringer project |
Post Reply 
|
Page 123> |
| Author | |
Tfreeman 
Groupie 
Joined: June-10-2016 Location: Dallas GA Status: Offline Points: 73 |
 Post Options Post Options
") Thanks(0) Thanks(0)
 Quote Reply Quote Reply
 Topic: 2017 Stringer project Topic: 2017 Stringer projectPosted: January-07-2017 at 12:37pm |
|
Looks like I'm at a point of being forced to do my stringers on my 83 SN2001.
This all started for me with the soft spot in front of the motor box. Being new to boat ownership, I had very little to go on when inspecting this boat. I figured the spot would just need a patch and new carpet. I thought I checked the stringers at the motor mounts but come to find out, the lag bolts were under the carpet and I actually checked the nut and bolt that mounts the motor mounts to the cradle. Had I known better, and appropriately checked, I'd have walked on this boat. Too late now. So far I am at an investigative point, I pulled the interior and disgusting blue camper carpet, pulled the battery box and factory cooler and scooped the soaked foam from that area. This is where the project was supposed to stop, I was going to add storage and move the battery, fix the floor and finish with the gray sheet seadek that I bought on the Black Friday sale. Then I began noticing that the wood portion of the floor was gone and that the top of the main stringers was soft. After pulling the floor in front of the observers seat. Both stringers are soft and wet. We use this boat for wakeboarding then typically end up anchored or tied up with friends. I have not kept it original, added tower, stereo, rear seating etc to better fit our needs. So in my mind I wanted a cheap boat to use for a few years and sell off for a v-drive for the interior space. But we thoroughly enjoyed the boat over last season, which extended in to late October here near Atlanta. I'll be tearing down and getting started as weather permits, I have tool boxes and my wife's new car in the garage so it looks like the tool boxes, swim platform and trailer will need to temporarily go. I will post here with updates as well as questions and photos as it progresses. Ideally it will be useable by summer this year. Appreciate all the help in advance from you all here. |
|
 |
|
|
Morfoot
Grand Poobah 

Joined: February-06-2004 Location: South Lanier Status: Offline Points: 5311 |
Post Options
Thanks(0)
Quote Reply
Posted: January-07-2017 at 2:00pm |
|
Sounds good Trevor. Glad you started a thread here and as always, document everything and take plenty of pics and post here and we will chime in and help you with the rebuild. At least our winters aren't too harsh here in GA and you can do a lot of ripping and tearing outside. Keep us in the loop and were here to help and guide you when needed.
|
|
|
"Morfoot; He can ski. He can wakeboard.He can cook chicken.He can create his own self-named beverage, & can also apparently fly. A man of many talents."72 Mustang "Kermit",88 SN Miss Scarlett, 99 SN "Sherman"
|
|
|
|
|
Tfreeman
Groupie
Joined: June-10-2016 Location: Dallas GA Status: Offline Points: 73 |
Post Options
Thanks(0)
Quote Reply
Posted: January-07-2017 at 5:35pm |
|
Pics I forgot to post earlier.
   
|
|
|
|
|
SNobsessed
Grand Poobah
Joined: October-21-2007 Location: IA Status: Offline Points: 7102 |
Post Options
Thanks(0)
Quote Reply
Posted: January-07-2017 at 7:12pm |
|
Trevor - If space is a problem, some guys have bought a temp car shelter, I think they can be had for a reasonable price. Then you can proceed at your own pace this spring.
Really sharp looking boat, BTW! |
|
|
“Beer is proof that God loves us and wants us to be happy.”
Ben Franklin |
|
|
|
|
Tfreeman
Groupie
Joined: June-10-2016 Location: Dallas GA Status: Offline Points: 73 |
Post Options
Thanks(0)
Quote Reply
Posted: January-07-2017 at 7:27pm |
|
Thank you, Snobsessed, I thought about that, harbor freight has a really affordable shelter, my concern there is temperatures and the glass work. According to my measurements I can fit her car in the garage with it if the toolboxes are removed and have the ability to close the door with the platform brackets off the boat.
I guess we will see. Do you happen to know about leaving it on the trailer and doing one stringer at a time maybe PB'ed in? Then finish after all 4 are in? That would allow it to be mobile and climate controlled at times. |
|
|
|
|
MechGaT
Senior Member 

Joined: March-09-2015 Location: Chattanooga Status: Offline Points: 271 |
Post Options
Thanks(0)
Quote Reply
Posted: January-08-2017 at 12:25am |
|
Some have done the one stringer at a time method. I am on my phone and I am not sure how long it would take to link some of them, but if you look at my thread "92 Sport floor replacement" I put several links in one of my early posts. Keeping it mobile is good. The grinding dust is awful and your wife will not appreciate it all over her car. I don't know that I would trust just the PB either. Laying some cloth fiberglass on each side of the stringer doesn't take that much more time and gives a better strength. My 2 cents.
|
|
|
'92 Sport Nautique
|
|
|
|
|
Tfreeman
Groupie
Joined: June-10-2016 Location: Dallas GA Status: Offline Points: 73 |
Post Options
Thanks(0)
Quote Reply
Posted: January-08-2017 at 10:09am |
|
Thanks for the advice. I'll look up your thread.
|
|
|
|
|
Watauga
Senior Member

Joined: June-12-2009 Location: United States Status: Offline Points: 208 |
Post Options
Thanks(0)
Quote Reply
Posted: January-08-2017 at 3:07pm |
|
Hi Trevor. Nice looking SN. You have a lot of work ahead of you to get done in a short amount of time. Thankfully you have the advantage of being in Georgia and better weather than some. Depending on how far you go in the rebuild, e.g., upholstery, engine rebuild, trailer rebuild, etc., you will need to invest between 200-400 man-hours or more. Therefore you can do the simple arithmetic of figuring out how much time per week you will need to invest to get her lake-ready by May, or whenever your lake season starts.
You can follow the links below to see my rebuild, I didn't have the uninterrupted time to invest in my rebuild, therefore it took me several years to get it done. |
|
|
|
|
rolleronariver
Senior Member
Joined: May-24-2016 Location: Rogers, AR Status: Offline Points: 195 |
Post Options
Thanks(0)
Quote Reply
Posted: January-08-2017 at 9:40pm |
If you start now you should be able to get it done by summer. I did mine in about a month and a half. I would've done it maybe a little quicker if the weather would've cooperated a little better. I still need to put my new carpet in but I'll get it done sometime when it warms up a little. Good luck to ya! It's a lot of work but very rewarding when it's done and the advise on this forum is incredible. Take your time was the best advise I was given. |
|
|
92 Sport nautique
|
|
|
|
|
Tfreeman
Groupie
Joined: June-10-2016 Location: Dallas GA Status: Offline Points: 73 |
Post Options
Thanks(0)
Quote Reply
Posted: January-08-2017 at 10:39pm |
|
I should have a fair amount of time to work on it. I am a fireman full time, I work a 24 hour shift , then off for 48 hours following that. I also have a pressure washing side business that picks up in the spring.
I will not need upholstery work, the trailer could use some attention but it can wait depending on way the time looks like. Motor was seemingly sound this summer so I think it will get a good cleaning before re installing. Also I have a neighbor that's willing to help, he is scratch building an all teak boat right now. Maybe a Chris craft?(edit: he's building a 1924 Palm beach 22) |
|
|
|
|
Tfreeman
Groupie
Joined: June-10-2016 Location: Dallas GA Status: Offline Points: 73 |
Post Options
Thanks(0)
Quote Reply
Posted: January-11-2017 at 3:03pm |
|
So I am doing some thinking in between working, sleeping and prepping the boat, I have a few questions.
The fresh air hoses, I've seen a few re routed for more space, I would like to do the same. Are the hoses more for fresh air in to the motor box? Or bad air out? Is it designed to flow air in the bow vents, through the bilge, and out the rear vents while moving? Is there any real reason for the hump under the bow or is only for routing the hoses, wiring, and mounting a kick pad for the driver? Thanks. |
|
|
|
|
8122pbrainard
Grand Poobah

Joined: September-14-2006 Location: Three Lakes Wi. Status: Offline Points: 41040 |
Post Options
Thanks(0)
Quote Reply
Posted: January-11-2017 at 3:32pm |
|
Trevor,
Your idea of air in the forward end and out the aft end is correct. You are also correct on the"hump" under the bow is for hose/cable routing and the mounting for the driver kick pad. Yes, many have done better than the factory with the fresh air ducting. I suggest using the thin wall PVC pipe method. |
|
|
|
|
TRBenj
Grand Poobah

Joined: June-29-2005 Location: NWCT Status: Offline Points: 21108 |
Post Options
Thanks(0)
Quote Reply
Posted: January-11-2017 at 3:51pm |
|
There really isn't any space to be gained by re-routing those air ducts... assuming you are keeping the battery in the same location. Flex pvc is much easier to work with than hard wall.
Go as big as you can on the cable/wiring conduit... it'll make life easier when you're installing cables down the line. A few benefits of the raised hump ("air box") are: -easy way to mount panels that hide ducting/wiring/etc. -raised height keeps water out (it will find the low point) |
|
|
|
|
8122pbrainard
Grand Poobah
Joined: September-14-2006 Location: Three Lakes Wi. Status: Offline Points: 41040 |
Post Options
Thanks(0)
Quote Reply
Posted: January-11-2017 at 4:01pm |
|
Trevor,
Tim doesn't know air movement!  The reason I suggested hard wall PVC it due to the rather large restriction of air when flex is used due to the internal corrugations of the flex. At any given static pressure, a smooth duct will allow more air flow. To get the same air flow using flex, you need to go up one size in diameter over a smooth duct. BTW, I don't feel cutting and solvent welding PVC pipe together is that difficult!! The reason I suggested hard wall PVC it due to the rather large restriction of air when flex is used due to the internal corrugations of the flex. At any given static pressure, a smooth duct will allow more air flow. To get the same air flow using flex, you need to go up one size in diameter over a smooth duct. BTW, I don't feel cutting and solvent welding PVC pipe together is that difficult!! 
|
|
|
|
|
TRBenj
Grand Poobah
Joined: June-29-2005 Location: NWCT Status: Offline Points: 21108 |
Post Options
Thanks(0)
Quote Reply
Posted: January-11-2017 at 4:55pm |
|
I would say I know air movement better than you know flex pvc!
 It is not corrugated on the ID, and it is dimensionally equivalent to hardwall. The reason it is much easier to work with when reconstructing correct crafts is because you don't need to align holes in bulkheads with a laser sight... the flex is forgiving and will accommodate some misalignment. Not to mention the complex bends from the bilge to the stbd side of the boat. You can use the space much more efficiently with the flex since you are not limited by standard bend angles and radiuses. Fewer below-floor joints is a bonus as well. I have rebuilt boats with both and the flex pvc is worth the extra $. Pete, you must be thinking of some other type of hose/pipe. Feel free to dig up the pics in my BFN thread. The most reasonably priced flex of pvc that McMaster sells (at least as of a few years ago) is green. 2.5" nominal gets you close to the original 3" OD of the dryer hose (making connections easier at the top side). Hardwall:  Flex: 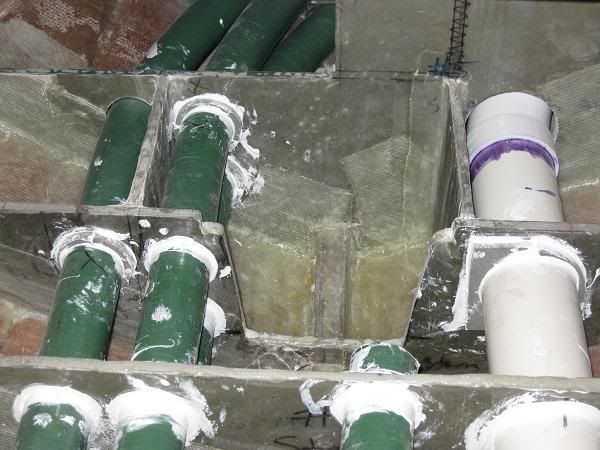 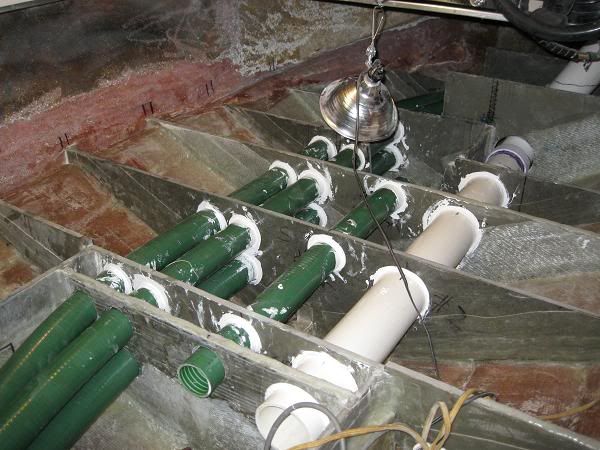
|
|
|
|
|
8122pbrainard
Grand Poobah
Joined: September-14-2006 Location: Three Lakes Wi. Status: Offline Points: 41040 |
Post Options
Thanks(0)
Quote Reply
Posted: January-11-2017 at 7:00pm |
Yes, flex ducting varies with the ID construction. Some are really bad for air flow and others that claim to be smooth are smoother but not like hard wall PVC pipe. Here's the green plastic flex from McMaster showing it's not really smooth.:  The other danger with using flex is not stretching it to it's full length leaving lots of corrugations on the ID. BTW, I use the McMaster flex for all the dust connections from the spiral ducting to all the equipment in my shop. I was VERY careful with selecting a flex that was as smooth as possible.
|
|
|
|
|
TRBenj
Grand Poobah
Joined: June-29-2005 Location: NWCT Status: Offline Points: 21108 |
Post Options
Thanks(0)
Quote Reply
Posted: January-11-2017 at 8:08pm |
|
I am not talking about flex ducting... I am talking about flexible PVC pipe. It conforms to the same sizing standards as hardwall PVC pipe, and you can mate the 2 types with hard pvc fittings. Can't recall the p/n I ordered from McMaster to be sure if you're looking at the right stuff or not... but it doesn't look like it. Regardless of how it is notionally depicted on their website, (or how it looks in my pic above) I can assure you it is smooth internally and externally. Bend radius is not very tight but its a heck of a lot more forgiving and easy to work with vs hard wall.
I am not sure how to make my point more clearly? You are certainly misunderstanding the product I am referring to. LMGTFY Google image search returns some good results to show the ID is smooth. |
|
|
|
|
Hollywood
Moderator Group 

Joined: February-04-2004 Location: Twin Lakes, WI Status: Offline Points: 13510 |
Post Options
Thanks(0)
Quote Reply
Posted: January-11-2017 at 8:18pm |
|
Spa hose. Same stuff lining the guide poles of the late 80s trailers.
 |
|
|
|
|
Tfreeman
Groupie
Joined: June-10-2016 Location: Dallas GA Status: Offline Points: 73 |
Post Options
Thanks(0)
Quote Reply
Posted: January-11-2017 at 11:40pm |
|
I initially pictured the spa hose reading that above. Seems like a combo of hard walled and flexible pvc might be something to consider.
I am not leaving the battery in the stock spot, but I haven't decided on the best spot yet. I have two batteries, one for starting and one for the tunes. I was hoping to turn some of that space in to a little bit of extra storage. |
|
|
|
|
8122pbrainard
Grand Poobah
Joined: September-14-2006 Location: Three Lakes Wi. Status: Offline Points: 41040 |
Post Options
Thanks(0)
Quote Reply
Posted: January-12-2017 at 8:01am |
|
Tim,
Thanks for clearing up the confusion. Yes, I'm talking "duct" and you're talking "hose/pipe"! Trevor, Getting back to ideal air movement with the least amount of restriction, and if you do go flex, don't go cheap drier ducting and do select something with a smoother ID. Also, I'm sure you noted that Tim used a combination of flex (the green) and hard (the white) on his BFN stringer job. |
|
|
|
|
Tfreeman
Groupie
Joined: June-10-2016 Location: Dallas GA Status: Offline Points: 73 |
Post Options
Thanks(0)
Quote Reply
Posted: January-12-2017 at 7:29pm |
|
Thanks for the input I'm taking notes.
Today I pulled the rudder, prop and disconnected everything I think I needed to pull the motor. I'm on duty tomorrow so it's coming out before the Falcons play Saturday. Pulled the floor in front of the motor box and raked out the wet foam.   The stringers are all soft mushy and wet. I accidentally vaccumed some of one out with the shop vac. Does anyone have a descent list of measurements I should take down? Or is the engine cradle my main concern? Thanks |
|
|
|
|
SNobsessed
Grand Poobah
Joined: October-21-2007 Location: IA Status: Offline Points: 7102 |
Post Options
Thanks(0)
Quote Reply
Posted: January-12-2017 at 10:50pm |
|
Get the engine & pylon back into the same place they started & the other points should fall into place.
|
|
|
“Beer is proof that God loves us and wants us to be happy.”
Ben Franklin |
|
|
|
|
Tfreeman
Groupie
Joined: June-10-2016 Location: Dallas GA Status: Offline Points: 73 |
Post Options
Thanks(0)
Quote Reply
Posted: January-14-2017 at 5:57pm |
|
Motor is out. Now I'm ready to start some serious work

|
|
|
|
|
Gary S
Grand Poobah

Joined: November-30-2006 Location: Illinois Status: Offline Points: 14096 |
Post Options
Thanks(0)
Quote Reply
Posted: January-14-2017 at 6:19pm |
|
Hope you didn't set that engine down in the truck bed sitting on the oil pan. If you did you will soon find out how unobtanium they are.
You need to build a frame out of 2x6's so that it sits on the motor mounts just like it's in the boat----- |
|
|
|
|
Tfreeman
Groupie
Joined: June-10-2016 Location: Dallas GA Status: Offline Points: 73 |
Post Options
Thanks(0)
Quote Reply
Posted: January-14-2017 at 11:54pm |
|
Nope it rode on a tire. With the mounts on it.
|
|
|
|
|
Gary S
Grand Poobah
Joined: November-30-2006 Location: Illinois Status: Offline Points: 14096 |
Post Options
Thanks(0)
Quote Reply
Posted: January-15-2017 at 1:28am |
 thats great,some parts are getting hard to come by and thats one of them. thats great,some parts are getting hard to come by and thats one of them.
|
|
|
|
|
Tfreeman
Groupie
Joined: June-10-2016 Location: Dallas GA Status: Offline Points: 73 |
Post Options
Thanks(0)
Quote Reply
Posted: January-15-2017 at 10:52pm |
|
Is this strainer something from the factory? The mount was loose and it just doesn't seem quite right to me.
 Also I didn't take a pic, but the previous owner swapped the fuel Filter over to a different type of screw on filter. I'm guessing it's in the factory location (on the engine cradle below the fuel pump) because of the marks under the housing from something previously mounted there. Does anyone have a photo of the factory fuel filter in its original location? |
|
|
|
|
Hollywood
Moderator Group
Joined: February-04-2004 Location: Twin Lakes, WI Status: Offline Points: 13510 |
Post Options
Thanks(0)
Quote Reply
Posted: January-15-2017 at 11:16pm |
|
Factory optional Vetus pool strainer and also Fram cartridge fuel filter/water separator. I would stick with the updated spin on fuel filter/separator and would also update the sea water strainer.
|
|
|
|
|
Tfreeman
Groupie
Joined: June-10-2016 Location: Dallas GA Status: Offline Points: 73 |
Post Options
Thanks(0)
Quote Reply
Posted: January-16-2017 at 7:49pm |
|
I guess I was trying to find out about the way they are mounted to the engine cradle. The fuel filter housing had two long lag bolts running in to the stringer and is too low to thread on the filter with out loosening the bracket.
And the strainer appeared to me like the previous owner tried to catch the rear-most engine cradle bolt and an extra screw, but failed at that. |
|
|
|
|
Dreaming
Platinum Member

Joined: May-21-2010 Location: Tacoma, WA Status: Offline Points: 1870 |
Post Options
Thanks(0)
Quote Reply
Posted: January-16-2017 at 9:50pm |
|
In the photos of several engine compartments, the strainers are visible... they vary in location though some right, some left, some further up than the others. Since this was an optional part (per Hollywood) it was probably left to whomever could run a screwdriver and connect the hose to install as they liked the best. I am not sure there is rhyme or reason to each installed location. I had to remove mine on my previous 82 to get the filter off too... I only did it once, but would have relocated it to a better location during the rebuild.
|
|
|
|
|
Post Reply
|
Page 123> |
 Tweet
Tweet
|
| Forum Jump | Forum Permissions You cannot post new topics in this forum You cannot reply to topics in this forum You cannot delete your posts in this forum You cannot edit your posts in this forum You cannot create polls in this forum You cannot vote in polls in this forum |


 Topic Options
 Tfreeman wrote: