 Boats For Sale:


1972 SN Promo Project |
Post Reply 
|
Page <1 56789 13> |
| Author | |
8122pbrainard 
Grand Poobah 

Joined: September-14-2006 Location: Three Lakes Wi. Status: Offline Points: 41040 |
 Post Options Post Options
") Thanks(0) Thanks(0)
 Quote Reply Quote Reply
 Posted: November-17-2016 at 8:15am Posted: November-17-2016 at 8:15am |
|
Chris,
I sure agree with Duane about flipping the hull. I've been there on my back working on bottoms and it sure isn't fun. (BTW, it never did anything to build up my arm muscles!  ) On the removing of the bottom paint, try RO sanding dry first before going to a chemical stripper. Removal will depend a lot on what type of bottom paint is on there and how much of it is on there. Both hard epoxy and ablatives can be a real PITA!! ) On the removing of the bottom paint, try RO sanding dry first before going to a chemical stripper. Removal will depend a lot on what type of bottom paint is on there and how much of it is on there. Both hard epoxy and ablatives can be a real PITA!!
|
|
 |
|
|
TRBenj
Grand Poobah

Joined: June-29-2005 Location: NWCT Status: Offline Points: 21108 |
Post Options
Thanks(0)
Quote Reply
Posted: November-17-2016 at 8:58am |
|
What in particular would drive you to wet sand the entire boat?
|
|
|
|
|
Duane in Indy
Platinum Member 
Joined: October-26-2015 Location: Indiana Status: Offline Points: 1578 |
Post Options
Thanks(0)
Quote Reply
Posted: November-17-2016 at 9:57am |
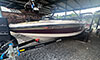
pics look like it is heavily oxidized. Would there be a better way to bring it back?? |
|
|
Keep it as original as YOU want it
1978 Mustang (modified) |
|
|
|
|
Hollywood
Moderator Group

Joined: February-04-2004 Location: Twin Lakes, WI Status: Offline Points: 13510 |
Post Options
Thanks(0)
Quote Reply
Posted: November-17-2016 at 10:36am |
|
There is no shine to it anywhere. The whole thing is chaulky.
|
|
|
|
|
TRBenj
Grand Poobah
Joined: June-29-2005 Location: NWCT Status: Offline Points: 21108 |
Post Options
Thanks(0)
Quote Reply
Posted: November-17-2016 at 10:47am |
|
Chalkiness will usually come out with a good compound in my experience. Scratch removal and color restoration is another story. I'd do my best to go easy over the lettering and then touch up afterwards if necessary.
|
|
|
|
|
skutsch
Grand Poobah

Joined: June-19-2008 Location: Racine, WI Status: Offline Points: 2874 |
Post Options
Thanks(0)
Quote Reply
Posted: November-17-2016 at 10:51am |
|
Which compound do you recommend? I know others have talked about the 3 step 3M process, but I have never been able to ascertain which specific 3M products make up the 3M 3 step...
|
|
|
|
|
TRBenj
Grand Poobah
Joined: June-29-2005 Location: NWCT Status: Offline Points: 21108 |
Post Options
Thanks(0)
Quote Reply
Posted: November-17-2016 at 11:40am |
|
3m super duty = step 1
3m finesse-it II finishing material = step 3 I've used a few different intermediate compounds for step 2... Read the bottle and see what grit scratches it will remove. Aim for 1500 grit for step 2 (super duty removes 1000 grit). Each needs to be matched to an appropriate pad (construction material and pyle height). I'd only resort to sanding if still unhappy with the finish after 1-2 rounds of super duty. Compound-->polish will certainly restore shine. |
|
|
|
|
Donald80SN
Grand Poobah
Joined: January-12-2009 Location: Denver, NC Status: Offline Points: 3887 |
Post Options
Thanks(0)
Quote Reply
Posted: November-17-2016 at 11:45am |
|
I hear there is a one step process you could use.
Hit that girl with some Mop N Glow and go.  Sorry, I could not help myself. |
|
|
1980 Ski Nautique SOLD Back to Cypress Gardens
2002 Sport Nautique, GT-40, FCT2, Cover Sports, Tower Bimini, Inc., Wet Sounds Audio System, Star Gazer Wake Edition S. 1968 Ski Nautique, Project. |
|
|
|
|
8122pbrainard
Grand Poobah
Joined: September-14-2006 Location: Three Lakes Wi. Status: Offline Points: 41040 |
Post Options
Thanks(0)
Quote Reply
Posted: November-17-2016 at 12:58pm |
|
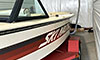
Considering the age of the boat, I'd say some wet sanding will be required. The orange is a bad color for fading and I'm sure there must be some scratches that will need attention.
Chris, Trace the hull side lettering now before you do anything. Tim mentioned trying to save the existing but you never know how well that will go. You can always have a Gerber (or equal) mask made from the tracing if the lettering does need restoring. Also, get some measurements on were the lettering is placed on the hull sides. |
|
|
|
|
bkhallpass
Grand Poobah

Joined: March-29-2005 Location: United States Status: Offline Points: 4723 |
Post Options
Thanks(0)
Quote Reply
Posted: November-17-2016 at 1:26pm |
|
You will need to compare the graphics carefully with some of the other promos, but it looked to me like somebody had embellished the original graphics with some highlighting. I just don't remember that on Stang's promo boat. I thought his lettering was simple block letters. It's also clear that someone had "touched" up some of the black on the letters. Long and short, if you are trying to restore this boat, I'm not convinced you won't be repainting the letters. Maybe not.
As to the paint on the bottom, are we sure it is actually bottom paint? I don't know. I'm not a bottom paint expert. But, it is very unusual for anyone to bottom paint a small boat here in the CA Delta. On the larger boats, the bottom paint I have seen used here, does not look like the paint on your boat. Seems like it would cost next to nothing to hit that paint on the bottom with a little paint remover, and see what happens. I have a theory that someone just painted the bottom black to cover up scrapes, scratches, or even a patch, on the bottom of the boat. I think they probably "freshened up the graphics" and changed the rub rail at the same time. Maybe it is bottom paint. Maybe it is epoxy. I don't know. Just seems cheap and very little time to experiment a bit. BKH |
|
|
Livin' the Dream
|
|
|
|
|
TRBenj
Grand Poobah
Joined: June-29-2005 Location: NWCT Status: Offline Points: 21108 |
Post Options
Thanks(0)
Quote Reply
Posted: November-17-2016 at 1:35pm |
|
Color and age of the boat will certainly play a part, and I agree that the orange will have faded in color. I disagree with Pete that the original color will come back with sanding, though... At least fully. The fade is likely to extend all the way through (at least that seems to be the case on the other orange boats from that era).
Tracing the lettering now while they are clear and complete is not a bad idea, but I suspect you'll have plenty to work with after buffing. |
|
|
|
|
GottaSki
Grand Poobah
Joined: April-21-2005 Location: NE CT Status: Offline Points: 3327 |
Post Options
Thanks(0)
Quote Reply
Posted: November-17-2016 at 1:46pm |
|
Speaking on only my experience with the darker colored hulls, the immediate results are similar, however found the results from buffing persist longer and more uniform with a modest wet sanding prior.
|
|
|
"There is nothing, absolutely nothing, half so much worthwhile as messing around with boats...simply messing."
River Rat to Mole |
|
|
|
|
Frankenotter
Platinum Member

Joined: August-26-2012 Location: Milwaukee Status: Offline Points: 1072 |
Post Options
Thanks(0)
Quote Reply
Posted: November-18-2016 at 12:02am |
|
So there seems to be a lot of different ideas on how to approach the gel, paint, sanding, and lettering. I think it might be worth a test to see what each method will yield. Right now I'm mostly concerned about the bottom paint. I plan to get sandpaper on that very soon. I ordered the hundred pack of 800 grit paper to start off. In the meantime I am definitely going to make some stencils of the lettering. I agree with Tim in that I want to try buffing around the lettering first before committing to getting rid of all of it. I'll try a section of wet sanding next to a section of buffing with 3M. Then we can decide which one looks better.
|
|
|
1999 Ski Nautique 196
|
|
|
|
|
Frankenotter
Platinum Member
Joined: August-26-2012 Location: Milwaukee Status: Offline Points: 1072 |
Post Options
Thanks(0)
Quote Reply
Posted: November-18-2016 at 12:04am |
Oh yea, I TOTALY forgot about the mop and glow. Well I'll just do that.
|
|
|
1999 Ski Nautique 196
|
|
|
|
|
JoeinNY
Grand Poobah

Joined: October-19-2005 Location: United States Status: Offline Points: 5693 |
Post Options
Thanks(0)
Quote Reply
Posted: November-18-2016 at 1:11am |
|
yeah so- taking off paint with 800 thats gonna be painful. Id be prepared to start with 220 dry at a minimum until you start seeing some orange spots, then 400 and a lighter touch till its all orange, then move on to 800 wet. Either way dont breath it. I use a RO 5 inch palm sander and a big compressor. Electric work but they weigh more and the dust will destroy them eventually.
|
|
|
|
|
skutsch
Grand Poobah
Joined: June-19-2008 Location: Racine, WI Status: Offline Points: 2874 |
Post Options
Thanks(0)
Quote Reply
Posted: November-18-2016 at 1:18am |
|
Chris if you are going the mop-n-glo, I am going to break out my belt sander and hit that bottom paint with some 80 grit. I'll get to the orange in a hurry!

|
|
|
|
|
Frankenotter
Platinum Member
Joined: August-26-2012 Location: Milwaukee Status: Offline Points: 1072 |
Post Options
Thanks(0)
Quote Reply
Posted: November-18-2016 at 1:27am |
No, the 800 will be for the gel. This bottom paint is like hard candy. I have sanding blocks for that. I tried buying a compressor off of craigslist but the guy never ended up replying. I have several old orbital sanders that I wouldn't mind if they broke. I'll just keep going until I'm out of $20 Sanders and then maybe get some more. In the meantime if I can find a good compressor then I'll Start looking into pneumatics |
|
|
1999 Ski Nautique 196
|
|
|
|
|
Frankenotter
Platinum Member
Joined: August-26-2012 Location: Milwaukee Status: Offline Points: 1072 |
Post Options
Thanks(0)
Quote Reply
Posted: November-18-2016 at 1:35am |
Steve you need to save that 80 grit for a different project. 
|
|
|
1999 Ski Nautique 196
|
|
|
|
|
TRBenj
Grand Poobah
Joined: June-29-2005 Location: NWCT Status: Offline Points: 21108 |
Post Options
Thanks(0)
Quote Reply
Posted: November-18-2016 at 11:22am |
|
It's not practical to avoid the lettering entirely when buffing... But be judicious with how much time and pressure is applied to painted surfaces. The paint is thick, it will survive.
Sanding vs compound will not yield an apples to apples comparison. Whatever step you go to (most aggressive) will need to be brought back up to polish in the end (each round after the most aggressive is intended to remove the scratches left by the previous round). You will need to get the 2 test spots to the same level to compare accurately. To compare 800 with SD compound, the 800 will need to be followed by 1000 (and maybe 1200) and compound. Otherwise the color/shine will look very different due to the inconsistent finish. The goal is always to do as few rounds of sanding and buffing as possible... Some people need to go through the process once themselves to understand why.
|
|
|
|
|
Frankenotter
Platinum Member
Joined: August-26-2012 Location: Milwaukee Status: Offline Points: 1072 |
Post Options
Thanks(0)
Quote Reply
Posted: November-18-2016 at 12:42pm |
Hollywood, do you still have that buffer available? |
|
|
1999 Ski Nautique 196
|
|
|
|
|
Hollywood
Moderator Group
Joined: February-04-2004 Location: Twin Lakes, WI Status: Offline Points: 13510 |
Post Options
Thanks(0)
Quote Reply
Posted: November-18-2016 at 12:57pm |
|
Yes. And all the pads and compounds
|
|
|
|
|
Dreaming
Platinum Member

Joined: May-21-2010 Location: Tacoma, WA Status: Offline Points: 1870 |
Post Options
Thanks(0)
Quote Reply
Posted: November-18-2016 at 2:58pm |
|
Since you're looking at compressors, yes, bigger tanks are nice, but it is not always needed. I have a 30 gal, and while It runs a lot when I am sanding, or spraying, I hardly ever have to stop and let it catch up... I find that I need a break, or want to inspect something closer, mix more paint etc, before the compressor runs down too significantly. After 15 years on the same compressor, only now is it starting to show the abuse. I have sanded and painted several cars with this one compressor, so I don't think I could have asked for much more reliability from it. The oil free compressors are loud, but are significantly less up front cost, if you're looking to save some coin. the noise can be mitigated a good deal if you go that route. Good luck finding one!
|
|
|
|
|
63 Skier
Grand Poobah

Joined: October-06-2006 Location: Concord, NH Status: Offline Points: 4232 |
Post Options
Thanks(0)
Quote Reply
Posted: November-18-2016 at 4:55pm |
|
Definitely minimum of 30 gallon tank, and there are tons of decent compressors that can be found on CL. I've never bought a new one. I'd look for a used pro model, with crankcase and belt drive. The quieter running is a huge advantage that you'll appreciate year after year. Look at cfm ratings, ignore the HP ratings as they are largely hype.
I'm kind of partial to Craftsman Professional compressors, not the red ones, these have black tanks and cost twice as much new. I run 2 of them and they seem to me to be bulletproof, quiet, and put out good volume. |
|
|
'63 American Skier - '98 Sport Nautique
|
|
|
|
|
81nautique
Grand Poobah

Joined: September-03-2005 Location: Big Rock, Il Status: Offline Points: 5766 |
Post Options
Thanks(0)
Quote Reply
Posted: November-18-2016 at 5:40pm |
Agreed plus, If you have 220 v at your garage that would be a big factor. You can score some great old 2 stage compressors for $5-600 on Craigslist that will run anything you throw at it. The 2 stages run slower so they're quieter and don't create as much heat. I just put in a new Champion 5hp 2 stage 220 3 phase at my print shop that is replacing a 7.5 hp Campbell Hausfeld unit but will provide all the air I could ever use.. It runs so quiet it's amazing. I looked at used on CL but for the business I went new. My home garage is getting wired 220 this winter so I'll probably pick up something decent used then. |
|
|
|
|
Donald80SN
Grand Poobah
Joined: January-12-2009 Location: Denver, NC Status: Offline Points: 3887 |
Post Options
Thanks(0)
Quote Reply
Posted: November-18-2016 at 7:58pm |
|
7.5 HP is the largest you can go for home use due to only having single phase power. Some industrial sites will only have single phase and they will run a duplex (two 7.5 motors and pumps) to get 15 HP on single phase. Also, be aware that there is Oil less and oil free compressors. One has no oil in the unit at all and one has oil but the oil has seals that will not allow the lube to get to the compressed air if the seals are working properly. The bigger the tank the less that compressor will run.
|
|
|
1980 Ski Nautique SOLD Back to Cypress Gardens
2002 Sport Nautique, GT-40, FCT2, Cover Sports, Tower Bimini, Inc., Wet Sounds Audio System, Star Gazer Wake Edition S. 1968 Ski Nautique, Project. |
|
|
|
|
8122pbrainard
Grand Poobah
Joined: September-14-2006 Location: Three Lakes Wi. Status: Offline Points: 41040 |
Post Options
Thanks(0)
Quote Reply
Posted: November-19-2016 at 12:04am |
|
At work today wearing the orange apron, I just happen to be looking at compressors and even forked a bunch off the DC truck. Black Friday deals are on now at the HD. You can get a decent made in China 30 gal. unit pretty cheap!!!
|
|
|
|
|
Frankenotter
Platinum Member
Joined: August-26-2012 Location: Milwaukee Status: Offline Points: 1072 |
Post Options
Thanks(0)
Quote Reply
Posted: November-19-2016 at 2:46am |
|
Thanks for the compressor tips gents! I'll keep an eye out but I'm afraid the boat budget isn't very high right now after buying a trailer, steering wheel, and tools. I might have to wait until after the holidays to make any more big purchases (hence the CL search).
In the meantime, I stopped at the garage on my way home from work to get up to speed following the engine pull. It all happened so fast that I didn't get to investigate a few details. First being the fuel tank. I fully expected it to be empty. However, not only did it still contain fuel, it also seems to be harboring something.....................perhaps solid? Video 18 We take our first close look at the dreaded bottom paint. Video 20 My idea for "mocking up" some measurements for the engine dimensions. Video 21 What should I do with this *&^*))(*& water pump? Video 22 |
|
|
1999 Ski Nautique 196
|
|
|
|
|
swilliams
Senior Member 

Joined: June-26-2016 Location: Cincinnati,Ohio Status: Offline Points: 234 |
Post Options
Thanks(0)
Quote Reply
Posted: November-19-2016 at 6:58am |
|
On the rwp, I would look for a replacement or send it off to be rebuilt. Those pumps seem to be readily available, not unlike my proprietary OMC pump.
|
|
|
|
|
TRBenj
Grand Poobah
Joined: June-29-2005 Location: NWCT Status: Offline Points: 21108 |
Post Options
Thanks(0)
Quote Reply
Posted: November-19-2016 at 7:54am |
|
The fuel tank is original.
Id hit that bottom paint with chemical stripper... May save you a lot of time sanding. I wouldn't worry much about minor cracking in the gel- it'll largely become unnoticeable once sanded and buffed. When sanding, go in straight lines (alternate directions), do not swirl. I think you're on the right path with documenting the engine location. Remember that the distance from mount to mount won't be a problem with the engine assembled. Stringer height at the mounts and location of the mounts from a fixed point will get you close enough to align it later. Identify the model number of the pump and call Depco. They can tell you what's available for rebuilding it. Surprised to see a Jabsco on there, the 70-72 Chryslers I've toyed with all had the dual pocket Sherwood. . |
|
|
|
|
td_in_nc
Senior Member
Joined: March-30-2012 Location: Clayton NC Status: Offline Points: 381 |
Post Options
Thanks(0)
Quote Reply
Posted: November-19-2016 at 11:11am |
|
On the RWP, can you cut the impeller along the axis of the spline then split it open? It you can get at least part of it split (tough to cut at the back of the housing) it may relieve enough pressure to pull it off.
|
|
|
|
|
Post Reply
|
Page <1 56789 13> |
 Tweet
Tweet
|
| Forum Jump | Forum Permissions You cannot post new topics in this forum You cannot reply to topics in this forum You cannot delete your posts in this forum You cannot edit your posts in this forum You cannot create polls in this forum You cannot vote in polls in this forum |


 Topic Options
 TRBenj wrote: