 Boats For Sale:


Foots/TimBobs New 72 Mustang |
Post Reply 
|
Page <1 23456 7> |
| Author | |
8122pbrainard 
Grand Poobah 

Joined: September-14-2006 Location: Three Lakes Wi. Status: Offline Points: 41040 |
 Post Options Post Options
") Thanks(0) Thanks(0)
 Quote Reply Quote Reply
 Posted: November-29-2015 at 10:54am Posted: November-29-2015 at 10:54am |
Tim, What's the panel? A composite/honeycomb? You do seem to have a means of procuring some great materials! 
|
|
 |
|
|
Gary S
Grand Poobah

Joined: November-30-2006 Location: Illinois Status: Offline Points: 14096 |
Post Options
Thanks(0)
Quote Reply
Posted: November-29-2015 at 11:12am |
|
You should see the new engine he has then. How he's going to mount the 13' constant speed prop will have to be seen.

|
|
|
|
|
Morfoot
Grand Poobah

Joined: February-06-2004 Location: South Lanier Status: Offline Points: 5311 |
Post Options
Thanks(0)
Quote Reply
Posted: November-29-2015 at 11:38am |
|
Pete it is indeed a composite panel of aluminum honeycomb core sandwiched between two fiberglass panels. The overall thickness is 1/2 thick I believe. I loaded my truck up years ago of the stuff that was too narrow for A/Cabin floor panels but the stuff is light , strong and perfect for attic flooring. Your head would explode if you saw all the stuff that gets tossed out. My beer fridge is a fridge they got rid of, my work bench in the garage is too. I may never retire as the fringe benefits to boat repair are too great!
Gary, I had to scale down the engine to a 9 Jug P&W.... The engine box for the other motor took out the drivers seat!
|
|
|
"Morfoot; He can ski. He can wakeboard.He can cook chicken.He can create his own self-named beverage, & can also apparently fly. A man of many talents."72 Mustang "Kermit",88 SN Miss Scarlett, 99 SN "Sherman"
|
|
|
|
|
NCH20SKIER
Grand Poobah

Joined: December-16-2004 Location: United States Status: Offline Points: 2205 |
Post Options
Thanks(0)
Quote Reply
Posted: November-29-2015 at 1:48pm |
|
Along this line of you would not believe what they throw out, back in Maine Thursday was "dump day" for Sabre Yacths and the scrap piles always had treasures that could be had for the taking.
|
|
|
'05 206 Limited
'88 BFN |
|
|
|
|
Morfoot
Grand Poobah
Joined: February-06-2004 Location: South Lanier Status: Offline Points: 5311 |
Post Options
Thanks(0)
Quote Reply
Posted: December-13-2015 at 11:08pm |
|
Work continues at a pretty good pace and have been able to get all the fabbing done on the various panels that needed replacement. Things are really slow at he so I've been able to get things done in my shop. Gotta cool boss for sure as inquired as to what I was doing and gave me his approval.
Kept pulling out wet foam as far as I could reach so I made the decision to cut the floor in front of the driver seat. Pulled out a total of 3 large trash cans of wet foam and after reaching the airbox, I finally hit foam that wasn't wet. dug another foot and pulled out dry foam so I quit. 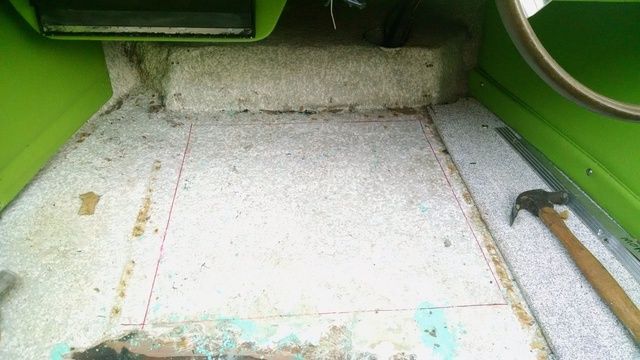 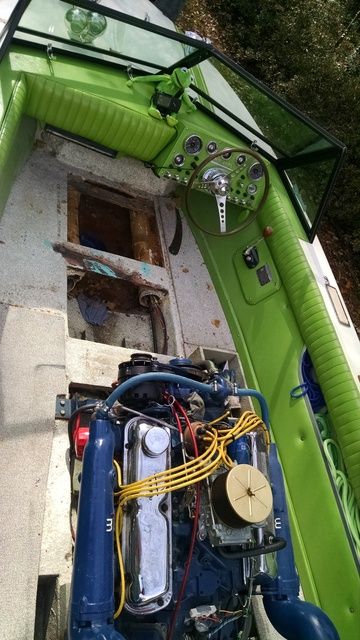 Got it all clean up and cpes'd the wood all around so its ready for some new glass and the bulkhead. 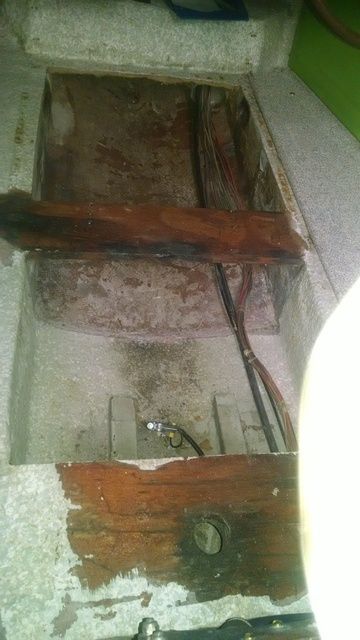 Aircraft floor panels with a honeycomb core is what I'm going to use in place of douglas fir. First using the old piece for dimensions I cut two 1/4 thick panels to be glued together to make the replacement 1/2" thick fir board. ] 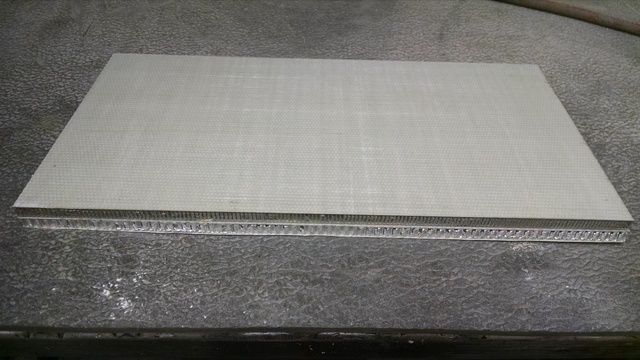 Stuck the two panels together with carpet so that they could have the tapered cut on around the circumference using the bandsaw. After this is done the panels core was routed out with a special tool 1/4" deep and then filled with resin and microballoons that is blue in color and when mixed basicalled lloks like smurf poo. This is done to basically seal the ends of the panel to prevent moisture intrusion disbonding the panel. 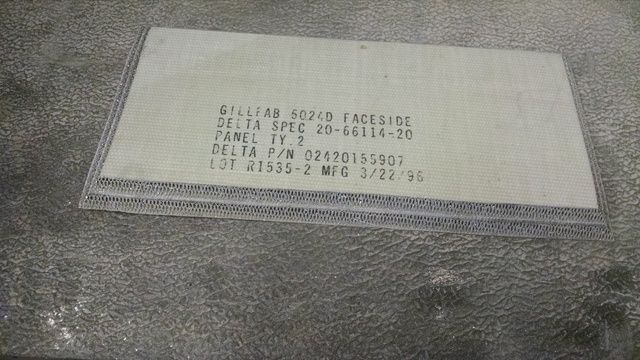 close up view of the panels core and construction.......Does this answer your above question Pete? 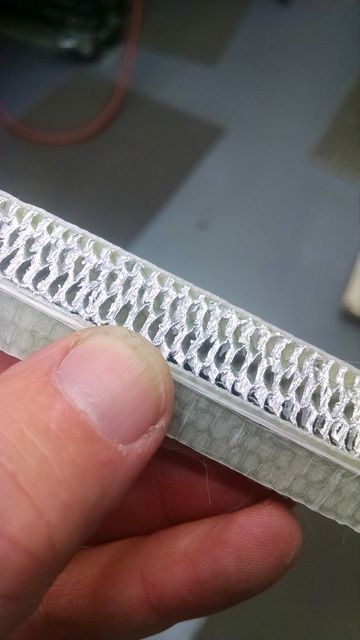 Placed a sheet of 250'F supportive adhesive in between the panels and placed it the oven under a vacuum of 20 psi and cured the adhesive. 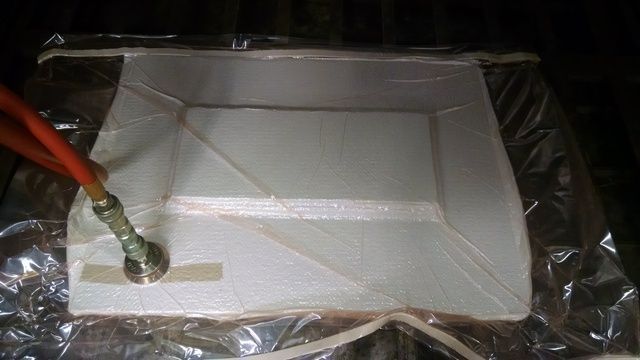 once cured I cu, t the hole in it for the rudder shaft support bracket, Routed out the core and filled it with' smurf'. Once cured I brought it home mixed up some Vinyl Ester with microballoons and buttered it up and set it in place. Used an anchor and weights to weigh it down.......couple days later its ready for glassing. 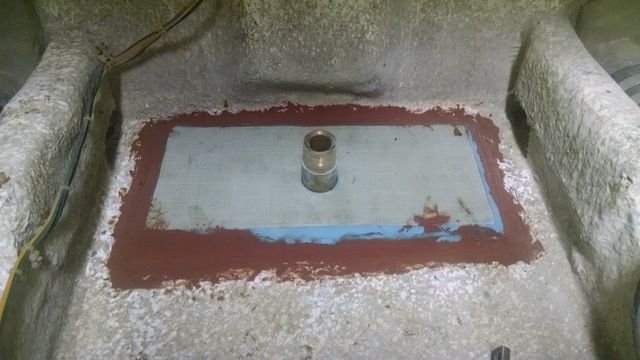 Here's a shot of the new web/bulkhead with the fresh air intake hole cut in it. This is just before the 'Smurf' is filled in to seal it up. 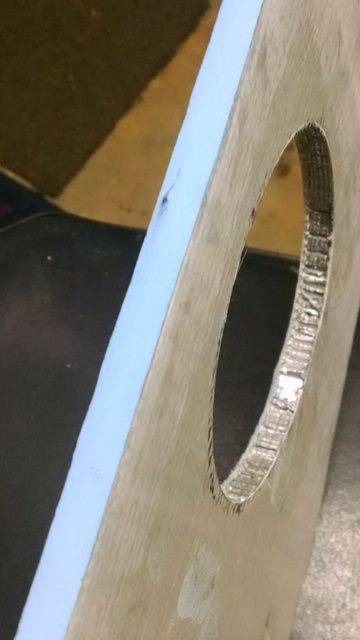 Test fitting complete....its ready to be installed. 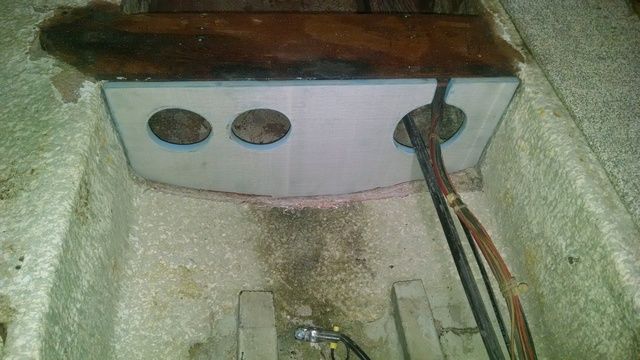 Pulled out the old dry rotted 'Dryer vent' intake hose and was gonna use the heavier gage aluminum vent hose but after discussing it with a couple guys here I decided to go with PVC.... Pondering it for a bit, I really wanted to go with something lighter so using some out of date epoxy I made air supply ducts by rolling epoxy impregnated fiberglass cloth over a coated piece of 3" PVC. Once cured I cut the glass with a knife and collapsed the tube till I got 3" diameter and epoxied the seam. cured it again then rolled it again in epoxy impregnated cloth. Came out great and they are strong and lightweight. 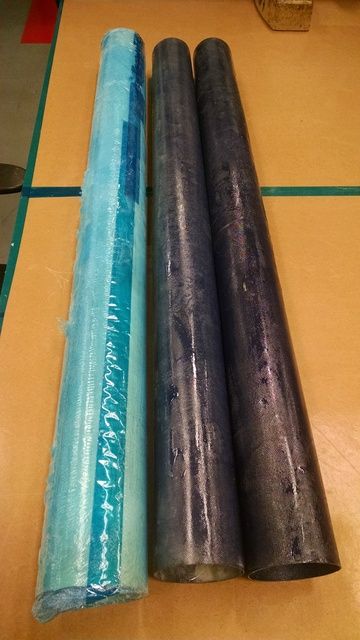 |
|
|
"Morfoot; He can ski. He can wakeboard.He can cook chicken.He can create his own self-named beverage, & can also apparently fly. A man of many talents."72 Mustang "Kermit",88 SN Miss Scarlett, 99 SN "Sherman"
|
|
|
|
|
NCH20SKIER
Grand Poobah
Joined: December-16-2004 Location: United States Status: Offline Points: 2205 |
Post Options
Thanks(0)
Quote Reply
Posted: December-13-2015 at 11:30pm |
|
Looking good Tim
|
|
|
'05 206 Limited
'88 BFN |
|
|
|
|
SNobsessed
Grand Poobah
Joined: October-21-2007 Location: IA Status: Offline Points: 7102 |
Post Options
Thanks(0)
Quote Reply
Posted: December-13-2015 at 11:50pm |
|
Great innovations!
I like the roll-your-own fiberglass tubes, might use that myself sometime. |
|
|
“Beer is proof that God loves us and wants us to be happy.”
Ben Franklin |
|
|
|
|
storm34
Grand Poobah

Joined: November-03-2008 Location: Dexter Iowa Status: Offline Points: 4492 |
Post Options
Thanks(0)
Quote Reply
Posted: December-14-2015 at 12:10am |
|
Looks great Tim! Way too fancy with the glass work tho!
|
|
|
|
|
8122pbrainard
Grand Poobah
Joined: September-14-2006 Location: Three Lakes Wi. Status: Offline Points: 41040 |
Post Options
Thanks(0)
Quote Reply
Posted: December-14-2015 at 6:00am |
|
Tim,
You sure have the knowledge base and tools/equipment at hand for all the high tech composite work. Fantastic!  Keep up with the work and I'm sure you won't forget the pictures. One thing, did you prep the bilge by grinding off the old resin before setting in the new honeycomb? Keep up with the work and I'm sure you won't forget the pictures. One thing, did you prep the bilge by grinding off the old resin before setting in the new honeycomb?
|
|
|
|
|
Smithfamily
Platinum Member 

Joined: December-26-2007 Location: Orlando, Fl Status: Offline Points: 1602 |
Post Options
Thanks(0)
Quote Reply
Posted: December-14-2015 at 7:18am |
|
Looking good! And with all that aircraft material she will likely "Fly"!
|
|
|
Js
|
|
|
|
|
Morfoot
Grand Poobah
Joined: February-06-2004 Location: South Lanier Status: Offline Points: 5311 |
Post Options
Thanks(0)
Quote Reply
Posted: December-14-2015 at 8:24am |
I did Pete, in fact the mating surface was so unlevel and full of voids and valleys that I had to fill them with cab-o-sil/resin a couple weeks before I installed the new panel. Did the process outside and left the boat out for the rest of the afternoon to cure. Pushed it back in at dusk. Got home from work the next day and the entire house smelled like the Correct Craft plant. Wow that stuff is fragrent. Sanded down the entire surface and still han a couple low spots but really 'buttered up' the panel before installing it. Weighing it down forced out all the excess compound and I just feathered it all out and used the rest I mixed up to really make a smooth transition for the glass to the panel when that day comes. |
|
|
"Morfoot; He can ski. He can wakeboard.He can cook chicken.He can create his own self-named beverage, & can also apparently fly. A man of many talents."72 Mustang "Kermit",88 SN Miss Scarlett, 99 SN "Sherman"
|
|
|
|
|
NCH20SKIER
Grand Poobah
Joined: December-16-2004 Location: United States Status: Offline Points: 2205 |
Post Options
Thanks(0)
Quote Reply
Posted: December-14-2015 at 8:47am |
|
I am of the belief that Tim is doing all of this in an effort to ensure that his HM Stang will out pace mine. The lengths some folks will go......................
|
|
|
'05 206 Limited
'88 BFN |
|
|
|
|
Morfoot
Grand Poobah
Joined: February-06-2004 Location: South Lanier Status: Offline Points: 5311 |
Post Options
Thanks(0)
Quote Reply
Posted: December-14-2015 at 9:09am |
|
Greg, I think you take the cake on style points though... 47 mph in a stang with rotten stringers, disenegrated floor, while sitting on a 5 gallon bucket!
Been hanging round, TrBenj, Joe, and Reid too much...... It's all about speed and how fast can 'Kermit go! |
|
|
"Morfoot; He can ski. He can wakeboard.He can cook chicken.He can create his own self-named beverage, & can also apparently fly. A man of many talents."72 Mustang "Kermit",88 SN Miss Scarlett, 99 SN "Sherman"
|
|
|
|
|
NCH20SKIER
Grand Poobah
Joined: December-16-2004 Location: United States Status: Offline Points: 2205 |
Post Options
Thanks(0)
Quote Reply
Posted: December-14-2015 at 9:11am |
|
I am going to slim down the paddle some and the clean out the pine needles and leaves from the bilge....and then, we line em up
|
|
|
'05 206 Limited
'88 BFN |
|
|
|
|
TRBenj
Grand Poobah

Joined: June-29-2005 Location: NWCT Status: Offline Points: 21108 |
Post Options
Thanks(0)
Quote Reply
Posted: December-14-2015 at 9:22am |
|
I think you're in trouble, Tim- Greg's beast went 49!
Glass work is looking good! |
|
|
|
|
BuffaloBFN
Grand Poobah

Joined: June-24-2007 Location: Gainesville,GA Status: Offline Points: 6094 |
Post Options
Thanks(0)
Quote Reply
Posted: December-16-2015 at 9:42am |
|
Slicky slick Tim.
Question-why did you choose cabosil over another filler? |
|
|
|
|
Morfoot
Grand Poobah
Joined: February-06-2004 Location: South Lanier Status: Offline Points: 5311 |
Post Options
Thanks(0)
Quote Reply
Posted: December-16-2015 at 10:45am |
|
Used cab-o-sil over microballoons basically causse thats what I had lying round the house. I didn't want the resin to run everywhere so I wanted to thicken it up. Vinyl Ester Resin doesn't like it though....took forever to get it mixed well enough to use. I was afraid it was gonna kick off before I got it mixed properly. MB's mixed in easier and worked a whole lot better as a filler when I bonded in the rudder box support piece. Using Vinyl E as thats what I have laying round. A chat with Pete confirmed that I needed to use VE resin for the exterior damage as gelcoat was going over it. Pete said epoxy would work but Gel doesn't like it as well and it might disbond down the road. VE was what I used to fix the external glass damage. Epoxy Resin anywhere internal is the way to go cause it doesn't smell up the house like the CC plant.
 Good thing the girls weren't home cause the boat is under their bedrooms. Good thing the girls weren't home cause the boat is under their bedrooms.
|
|
|
"Morfoot; He can ski. He can wakeboard.He can cook chicken.He can create his own self-named beverage, & can also apparently fly. A man of many talents."72 Mustang "Kermit",88 SN Miss Scarlett, 99 SN "Sherman"
|
|
|
|
|
8122pbrainard
Grand Poobah
Joined: September-14-2006 Location: Three Lakes Wi. Status: Offline Points: 41040 |
Post Options
Thanks(0)
Quote Reply
Posted: December-16-2015 at 11:42am |
Or in your desk drawer?
|
|
|
|
|
Riley
Grand Poobah

Joined: January-19-2004 Location: Portland, ME Status: Offline Points: 7946 |
Post Options
Thanks(0)
Quote Reply
Posted: December-16-2015 at 11:51am |
|
Tim, was that a section of glassed over plywood you cut out in the front of the engine? I'm guessing the construction is similar as a '78 Tique? What kind of saw did you use to make the cut? Was the pylon difficult to remove?
|
|
|
|
|
Morfoot
Grand Poobah
Joined: February-06-2004 Location: South Lanier Status: Offline Points: 5311 |
Post Options
Thanks(0)
Quote Reply
Posted: December-16-2015 at 1:17pm |
Like who keeps Cab-O-Sil in their desk drawer?.....now in the 5 gal bucket underneath the resin table.....maybe!  Bruce, it was nothing but glassed over foam. The bulkhead/web served as a dam for the poured in foam at the factory. Once it cured they just glassed over it then covered the glass with the speckled bilge coat.. I only had to cut thru 1/8" thick glass (as I pulled out most of the foam under it already) using a diamond cutting wheel in a 90' Die Grinder. Pylon was easy peasy as I had removed it once before shortly after I purchased it.. The pylon had a lot of free play in it so I reamed up the attaching/pin bolt from 1/4" to 5/16" and filled the receiving cup full of grease before I reinstalled the pylon. I still have the section I cut out...will snap a pic and post it later. |
|
|
"Morfoot; He can ski. He can wakeboard.He can cook chicken.He can create his own self-named beverage, & can also apparently fly. A man of many talents."72 Mustang "Kermit",88 SN Miss Scarlett, 99 SN "Sherman"
|
|
|
|
|
TRBenj
Grand Poobah
Joined: June-29-2005 Location: NWCT Status: Offline Points: 21108 |
Post Options
Thanks(0)
Quote Reply
Posted: December-16-2015 at 1:29pm |
|
Floor structure is quite different 72 vs 78. 72 was still using the vinyl wrapped ply installed over the thin glass floor. By 78, the ply (front area only) was incorporated below the glass.
|
|
|
|
|
Riley
Grand Poobah
Joined: January-19-2004 Location: Portland, ME Status: Offline Points: 7946 |
Post Options
Thanks(0)
Quote Reply
Posted: December-16-2015 at 1:44pm |
|
We've encountered some rot in the pylon support. It's about a 6"x6" section mid way between the stringer and pylon and at the stern end of the support. Every way I think to repair it seems a bit hokey and a better repair seems to be replacing the whole support, But I'm trying to figure out a way in there without going down the road leading to major repairs.
|
|
|
|
|
Morfoot
Grand Poobah
Joined: February-06-2004 Location: South Lanier Status: Offline Points: 5311 |
Post Options
Thanks(0)
Quote Reply
Posted: December-16-2015 at 2:59pm |
|
Snap a pic Bruce and post it here so we can see whatcha' got and come up with a possible plan of attack on the problem.
|
|
|
"Morfoot; He can ski. He can wakeboard.He can cook chicken.He can create his own self-named beverage, & can also apparently fly. A man of many talents."72 Mustang "Kermit",88 SN Miss Scarlett, 99 SN "Sherman"
|
|
|
|
|
TRBenj
Grand Poobah
Joined: June-29-2005 Location: NWCT Status: Offline Points: 21108 |
Post Options
Thanks(0)
Quote Reply
Posted: December-16-2015 at 3:45pm |
|
While my Tique and BFN were admittedly deteriorated to the point where it was hard to be 100% sure what the original structure looked like, I do not believe there was much of a standalone "pylon support" in either. It was all integrated with the floor. I agree that there is unlikely to be a clear and simple scope to any repair in that area, as it's all one piece and the further you dig, the more ugliness you're likely to find. Plus the carpet will be impacted by any top side work. Pics would indeed be helpful in guessing what might work.
|
|
|
|
|
75 Tique
Grand Poobah

Joined: August-12-2004 Location: Seven Lakes, NC Status: Offline Points: 6097 |
Post Options
Thanks(0)
Quote Reply
Posted: December-16-2015 at 4:18pm |
|
I am working on a revised pylon support as well. Last year, my pylon took on a lot of play. I overtaxed it in terms of loading it (a few four mans). In hindsight it all could have been avoided if I used my fly high for extra support, but live and learn. In first digging into it, I learned that my support had been modified, I think probably at the time of some PO floor work. What he did was add an aluminum frame under the floor to provide extra support. Pictured here.
 I think he did that because he modified the floor in a why that would no longer support the pylon. So this wasn't a bad idea, until I bent it as can be seen in this photo, probably about 1/2 inch. I did a quick remedy by redrilling the holes in the wood above it, so it would relocate everything back that 1/2 inch. I then used some metal strips to shim the gap between the pylon and aluminum frame. Well that was all good for a while, and I was pretty careful to use my flyhigh whenever loading up after that. But then I may have missed a time, because it loosened up again. I reinforced the bolting of the wood to the metal frame because I thought there was some slop between the wood and the frame and tested it again. This time I found out that it was the frame that was moving. There was slop between what I assume are lags, not through bolts, that hold the frame to the stringers. OK, so maybe my stringers are starting to soften a bit, at least where those bolts/screws were. So I needed a better fix, and since it was the middle of the summer made a temporary fix. I peeled up the carpet and found not much at all. I finally found what had been done.  The original system had been replaced with the two boards with the holes to the rear of the pylon. Since there was nothing forward of the pylon to hold it in place, he added the metal frame. In front of the pylon, completely unattached from the two boards was this mess of rotten wood and resin. So I cut/tore all that mess out. For now, I have a 2x8 in place with a snug hole for the pylon. It is held in place with angle brackets and lags. Seems pretty sturdy, not sure how long it will last. I was thinking of a replacement set up and I came up with something like this. What about cutting "troughs" into the tops of the stringers to allow a 2 x 8 or 2 x 10 to lay right down in. That way you are not relying on any kind of nut and bolt system, but the strength of the wood. 
|
|
|
_____________
“So, how was your weekend?” “Well, let me see…sun burn, stiff neck, screwed up back, assorted aches and pains….yup, my weekend was great, thanks for asking.” |
|
|
|
|
Riley
Grand Poobah
Joined: January-19-2004 Location: Portland, ME Status: Offline Points: 7946 |
Post Options
Thanks(0)
Quote Reply
Posted: December-16-2015 at 6:23pm |
|
I'll get some pics posted, but the support looks like 2 pieces of 3/4" plywood that are notched into the stringers like on the 60's boats and Tim's Kermit. Funny, one of the fixes I had in mind is sort of what was done on Larry's boat. Another option which is probably way too much work is to use an aluminum cradle from a BFN, but I imagine that would require a lot work to install it. At this point I've only inspected it from the side profile from the bilge. I have no idea what's under the carpet and in front of the support. Git Rot would firm it up, but I'm told this boat may be used for footing. I just don't want to stir up a hornet's nest by tearing up the floor and was optimistic at how nicely Tim Morfoot's boat came apart.
|
|
|
|
|
TRBenj
Grand Poobah
Joined: June-29-2005 Location: NWCT Status: Offline Points: 21108 |
Post Options
Thanks(0)
Quote Reply
Posted: December-16-2015 at 6:40pm |
|
Bfn cradle is an impossibility, you'd be miles ahead starting from scratch with some new angle and a welder. Cradle shape is waaaaay different due to the wildly varying stringer vs floor heights in the 2 boats in question.
A 2gen or 2001 cradle might work but probably not without significant changes made to the floor and stringer area all around the engine compartment. Probably not a great option if you're trying to keep things simple. Tearing that area of the floor open and then beefing it up in a manner similar to (but an improvement over) the factory style would probably get my vote. Keep the repair localized and you may even get away with piecing in the carpet rather than doing the whole floor. If you don't trust your repair wholeheartedly (or if you want to skip the repair altogether) then SDBM and a fly high will keep the stress off the pylon/floor area. |
|
|
|
|
8122pbrainard
Grand Poobah
Joined: September-14-2006 Location: Three Lakes Wi. Status: Offline Points: 41040 |
Post Options
Thanks(0)
Quote Reply
Posted: December-16-2015 at 7:01pm |
|
Larry and Bruce,
I agree with Tim that opening up the floor would be best. Yes, you don't know what you'll get into but, you also don't want to do a back yard on it that won't work or worse yet break at a bad time. Larry, looks like the PO even used some Marine Tex on that "fix"!! 
|
|
|
|
|
Riley
Grand Poobah
Joined: January-19-2004 Location: Portland, ME Status: Offline Points: 7946 |
Post Options
Thanks(0)
Quote Reply
Posted: December-16-2015 at 10:01pm |
|
I'll post some pics and move to a new thread so not to highjack Tim's thread.
|
|
|
|
|
67nautique312
Gold Member

Joined: June-23-2004 Location: United States Status: Offline Points: 883 |
Post Options
Thanks(0)
Quote Reply
Posted: December-18-2015 at 1:35pm |
|
WOW....Nice work there Timmy!! I hate foam!! especially wet foam!! been there done that!
Keep up the good work! |
|
|
1963 Classic (handed down to my daughter)
67 Riviera 68 barracuda 1971 Ski Nautique Promo 86 Silver Nautique 1995 Ski Nautique |
|
|
|
|
Post Reply
|
Page <1 23456 7> |
 Tweet
Tweet
|
| Forum Jump | Forum Permissions You cannot post new topics in this forum You cannot reply to topics in this forum You cannot delete your posts in this forum You cannot edit your posts in this forum You cannot create polls in this forum You cannot vote in polls in this forum |


 Topic Options
 Morfoot wrote: