 Boats For Sale:


ProTec Ignition Swap |
Post Reply 
|
Page 123> |
| Author | |
JPASS 
Grand Poobah 

Joined: June-17-2013 Location: Orlando Status: Offline Points: 2283 |
 Post Options Post Options
") Thanks(2) Thanks(2)
 Quote Reply Quote Reply
 Topic: ProTec Ignition Swap Topic: ProTec Ignition SwapPosted: August-06-2014 at 10:31pm |
|
So I just swapped out my original, leaking ProTec Ignition for a new D.U.I. set-up. I figured I would take some pics and attempt to do a write up to help out others who attempt this swap in the future.
The entire job took between 4-5 hours. Here's a LINK to my original thread where many of my questions were answered with the help of the members from this forum. I went with THIS DUI from Summit and THIS wire crimping tool. Make sure the main ignition breaker on the dash is off and the key is in the off position as well. Begin by disconnecting the TRIGGER PLUG from the ProTec dizzy. Next, loosen the dizzy lock down bolt located at the base of the dizzy.  Remove the bolt and lock down clamp and place them off to the side. Wiggle the dizzy while pulling up on it to remove the dizzy from the motor. Use a shop vac to clean up anything that may be down in the hole that may have fallen in during the dizzy removal. At the bottom of the hole you will see the hexagonal oil pump shaft. This sits in the bottom of the dizzy and must be fully engaged when installing the new dizzy.  Remove all of the stock plug wires from the spark plugs. Remove the EMS PLUG (wire harness) from the coil pack by loosening the bolt holding it to the coil pack.  Remove the three nuts on the underside of the plate that the ProTec coil pack sits on.  Remove the coil pack. The EMS PLUG is labeled for each wire going into it from the harness. Cut the wire at the back of the EMS connector going to P (12Vdc from key). Cut the wire at the back of the EMS connector going to D. Connect the wires from P and D together. This will provide 12V power to the dizzy.  Cut the wire at the back of the EMS connector going to E (Tach wire from dash). Cut the wire at the back of the EMS connector going to C. Connect the wires from E and C together. This will be the tach signal wire.  Cut the wire at the back of the EMS connector going to G (or M, both are Ground). Cut the wire at the back of the EMS connector going to B. Connect the wires from G and B together.  Install the new dizzy. Don't force it down into the hole if you feel resistance. If it doesn't engage the oil pump shaft properly (fully seated on the block), bump the ignition key while pressing down on the dizzy until the dizzy is firmly seated on the block. Cut the wire at the back of the Trigger Plug going to A Turn on the key and using a DMM set to measure Volts DC verify that it reads about 12Vdc Turn off the key Connect the wire from A to the DUI 12Vdc input wire.  Cut the wire at the back of the Trigger Plug going to B Using a DMM set to Ohms verify this wire goes to the back of the dash Tachometer (should be a low number close to 0.0 Ohms) or just verify it does not go to power or ground. Connect the wire from B to the DUI Tachometer output wire  If your dizzy requires a ground, follow the next step. My D.U.I. did not, so I removed the remaining wire on the Trigger Plug. Cut the wire at the back of the Trigger Plug going to C Using a DMM set to Ohms verify this wire is connected to Ground (should be close to 0.0 Ohms) Connect the wire from C to the DUI Ground wire Cut the last wire from the Trigger Plug and discard the plug and the last wire is not used The EMS connector can either be cut off or left alone. There is nothing going to the connector that would cause a problem. You will also have to disconnect the knock sensor plug wire that is attached to the EMS Plug.  |
|
|
'92 Correctcraft Ski Nautique
|
|
 |
|
|
JPASS
Grand Poobah
Joined: June-17-2013 Location: Orlando Status: Offline Points: 2283 |
Post Options
Thanks(0)
Quote Reply
Posted: August-06-2014 at 11:03pm |
|
Remove all of the spark plugs.
It's preferred to go with new plugs, but if you keep the old ones, be sure to open the gap to 0.050 - 0.055 Remove the dizzy cap and find TDC on cylinder 1 (compression stroke). I did this by having a buddy crank the motor with a socket on the crank pulley while I held my thumb over the spark plug hole. Once I felt the pressure build, I knew I was on the compression stroke. I used a wooden dowel to stick down the hole to make sure I was at TDC. We hand cranked the motor until the dowel no longer moved up while contacting the piston head. Use a sharpie to mark the dizzy body where the rotor is now pointing. This is where the #1 spark plug wire must go on the dizzy cap. Reinstall the dizzy cap (should be notched so it only fits one way). Mark the #1 cylinder post on the dizzy cap. Refer to your owners manual for the proper cylinder numbering, firing order, and dizzy rotation. I used this diagram to run the wires (LH rotation 351W)  When getting ready to run your spark plug wires, be sure to separate them out by length. There should be 2 of each length. I ran each wire from the plug up to the dizzy and wedged the wire between the dizzy cap post to adjust the lengths to where I liked how they looked. Once you are certain the wires are in the correct order on the cap, you can begin to terminate the ends. I used this video to see how it's done as I've never done it before: Using the strippers on the crimper, strip back 1/2" from the wire end to expose the inner core  Place the terminal end into the crimper.  Fold the core back on the spark plug wire insulation and place that side into the curved (closed) end of the terminal. Crimp the wire.  Using a Q-Tip and some petroleum jelly, lube the boot and slide it over the terminal end. Install the terminated plug wire on it's appropriate post. Repeat for the rest of the plug wires. I would buy some plug wire organizers to keep things nice and tidy.    You're ready to try and start her up and check the timing. Timing should be 12 degrees at idle and about 34 degrees at 3K RPM. Your timing requirements may differ. Be sure you have a water source hooked as you don't want to run the motor or RWP dry.  Adjust the timing by rotating the dizzy until the correct timing is achieved. Once you are happy with the timing, tighten the dizzy hold down bolt and have a beer or 3 for all your hard work. |
|
|
'92 Correctcraft Ski Nautique
|
|
|
|
|
KRoundy
Platinum Member 
Joined: August-23-2010 Location: Lake Stevens Status: Offline Points: 1702 |
Post Options
Thanks(0)
Quote Reply
Posted: August-07-2014 at 2:05am |
|
Great write-up, JP!!! As promised, this has been added to the FAQ.
|
|
|
Previous: 1993 Electric Blue/Charcoal Ski Nautique
Current: 2016 Ski Nautique 200 Open Bow |
|
|
|
|
rosconole
Gold Member

Joined: May-10-2008 Location: United States Status: Offline Points: 758 |
Post Options
Thanks(0)
Quote Reply
Posted: August-12-2014 at 2:34am |
|
dude your black spark arrestor cover is missing.. did it catch on fire??
5.00 for timing tape...http://www.summitracing.com/parts/sum-163594?seid=srese1&gclid=Cj0KEQjw06GfBRCR9tDI4t6n5_MBEiQAFo6kuLzyOJkGoTRKxe6VIhr0nHaniyH_d8nu-PJ8vvS6ghYaAhyH8P8HAQ |
|
|
1989 ski nautique ,1991 barefoot nautique, 1993 Mustang Cobra 1998 5.0 Magazine shootout invitee
|
|
|
|
|
KRoundy
Platinum Member
Joined: August-23-2010 Location: Lake Stevens Status: Offline Points: 1702 |
Post Options
Thanks(0)
Quote Reply
Posted: May-25-2015 at 12:45pm |
|
Shout out to JP this morning from me. JP - well done sir! Using only a print-out of this excellent write up, my engine bay now looks like this:
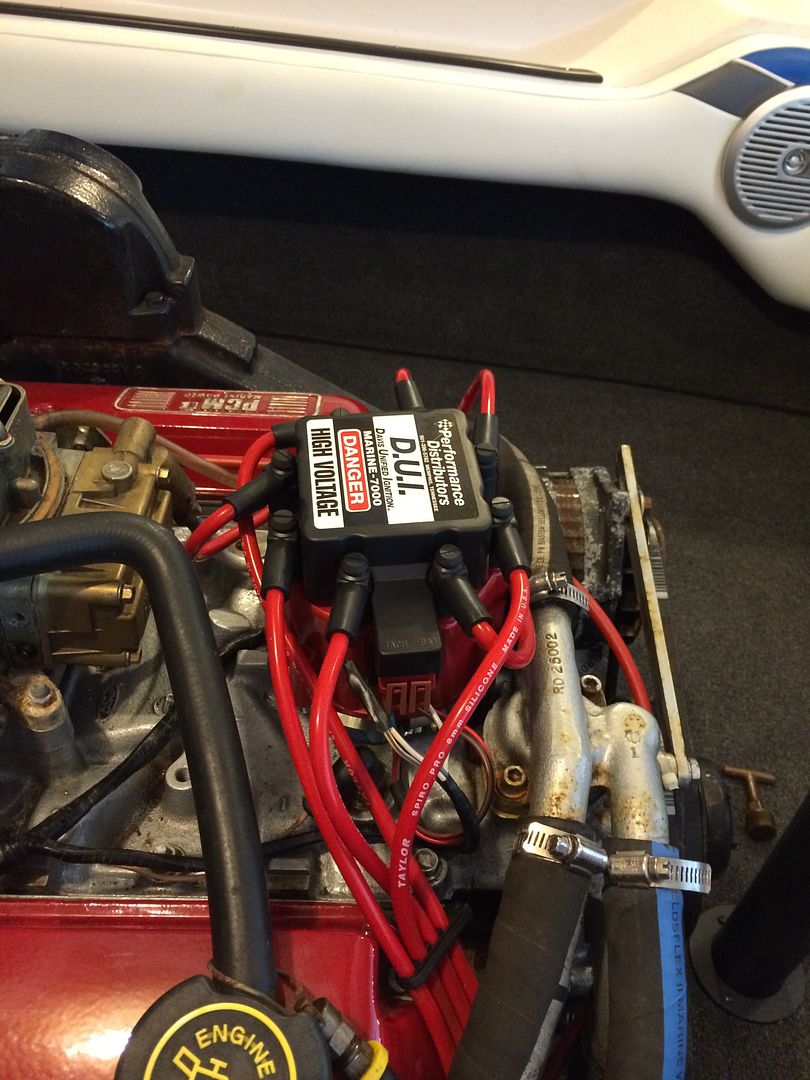 I'll add in my two cents of additional thoughts. 1. Do everything as JP has written it up. 2. It likely makes sense but note the orientation of the DUI in both photos. If your DUI installation is at a drastically different angle there's a chance you are doing something wrong. 3. I trimmed that hose that goes from the valve cover to the inlet screen / fire arrester on top of the carb to provide clearance between that hose and the DUI. That seemed to work. 4. You need to buy new plug wires. I tried re-using the ones that were on my ProTec (they were relatively new), but the longest wires could not reach. Here is the wire set I purchased: Taylor Spiro-Pro 90-degree univeral wire set I followed JP's advice and got the same crimping tool and purchased a set of wire organizers too. Thank you JP! I can't wait to give this a go on the lake. |
|
|
Previous: 1993 Electric Blue/Charcoal Ski Nautique
Current: 2016 Ski Nautique 200 Open Bow |
|
|
|
|
Orlando76
Grand Poobah

Joined: May-21-2013 Location: Mount Dora, FL Status: Offline Points: 3108 |
Post Options
Thanks(0)
Quote Reply
Posted: May-25-2015 at 2:50pm |
|
Looks like I'll be doing this shortly as well as my idle seems a bit lope-y. I'm guessing the original Pro Boss cover doesn't fit with the DUI? Does any distributor fit under the cover?
|
|
|
|
|
KRoundy
Platinum Member
Joined: August-23-2010 Location: Lake Stevens Status: Offline Points: 1702 |
Post Options
Thanks(0)
Quote Reply
Posted: May-25-2015 at 3:34pm |
|
The original Pro Tec cover will not fit with a DUI installed. I do not know about other systems. JP mentioned trying to modify the cover to work. Any updates JP? I think if one were to trim it out the front edge of the cover it could work. I might tinker with that a bit today and report back.
|
|
|
Previous: 1993 Electric Blue/Charcoal Ski Nautique
Current: 2016 Ski Nautique 200 Open Bow |
|
|
|
|
KRoundy
Platinum Member
Joined: August-23-2010 Location: Lake Stevens Status: Offline Points: 1702 |
Post Options
Thanks(0)
Quote Reply
Posted: May-25-2015 at 3:36pm |
|
Oh, and just one more comment - the idle was noticeably smoother with the DUI installed. The engine really seemed "eager" to run with the DUI. I'll also report back after my on-the-water test.
|
|
|
Previous: 1993 Electric Blue/Charcoal Ski Nautique
Current: 2016 Ski Nautique 200 Open Bow |
|
|
|
|
Jonny Quest
Grand Poobah

Joined: August-20-2013 Location: Utah--via Texas Status: Offline Points: 2840 |
Post Options
Thanks(0)
Quote Reply
Posted: May-25-2015 at 9:01pm |
I got my DUI / HEI distributor and new carburetor to fit under my Pro-Boss cover: 
|
|
|
Current
2003 Ski Nautique 206 Limited Previous 2001 Ski Nautique Open Bow 1994 Ski Nautique Open Bow Aqua skiing, ergo sum |
|
|
|
|
JPASS
Grand Poobah
Joined: June-17-2013 Location: Orlando Status: Offline Points: 2283 |
Post Options
Thanks(0)
Quote Reply
Posted: May-25-2015 at 11:04pm |
|
Kroundy: glad my write up helped. A big thanks to those who gave me the info I needed to be able to create that write up in the first place.

Mine fit, but the front lower edge of the cover made contact with my wires on the dizzy. I notched the cover in the front to give more clearance, but I wound up not using the cover. I'm also running a 4010 holley. Not sure if it's any shorter than the 4160. |
|
|
'92 Correctcraft Ski Nautique
|
|
|
|
|
Orlando76
Grand Poobah
Joined: May-21-2013 Location: Mount Dora, FL Status: Offline Points: 3108 |
Post Options
Thanks(0)
Quote Reply
Posted: June-21-2015 at 10:13pm |
  Thanks John. Unfortunately blue was all that was available. Doesn't look terrible. |
|
|
Please support The Cystic Fibrosis Foundation
1976 Ski Nautique 351 Escort 1993 Ski Nautique purple and black 351 HO PCM |
|
|
|
|
malcolm2
Senior Member 

Joined: June-13-2010 Location: Nashville Status: Offline Points: 235 |
Post Options
Thanks(0)
Quote Reply
Posted: October-23-2015 at 12:09pm |
|
DUI and plug wires arrived... Excited about installing and test starting ASAP. I do have some questions for the folks that have done this....
My boat is a 92 with a Holley carb. Questions: 1. Coil Packs and wire connector are removed and disposed of, correct? 2. In the write up above, 1 wire on the EMS connector is not accounted for "F" (and the other ground, I plan to wire nut both ground wires, or follow them to the block and remove them.) But what about "F"? wire is labeled 30 and goes to the water temp switch and the OP switch. 3. are these switches only giving the EMS feedback, will they be useless once the EMS is gone? Again, I assume I should tape, wire nut or remove the #30 wire? Or if I am really bored, maybe pull the switches and block off the holes? 4. Not that it matters, I am curious tho. If wire 30 goes to 2 switches, how does the EMS know what each switch is (or was) doing?  Thanks for the great write up.... And for all who have replied. Clark |
|
|
|
|
JPASS
Grand Poobah
Joined: June-17-2013 Location: Orlando Status: Offline Points: 2283 |
Post Options
Thanks(0)
Quote Reply
Posted: October-23-2015 at 12:33pm |
|
Let me try to answer your questions as I did this on our '92:
1) Do whatever you want with the coil packs and wires. I simply threw them away as the coil packs were leaking and I used an old spark plug wire to test out my newly acquired crimping skills. 2) F is no longer needed as once the ECM is removed, the sensor becomes useless. 3) Yes. I simply cut the wire back and capped it with some small heat shrink tubing. 4) No idea. Hope this helps. |
|
|
'92 Correctcraft Ski Nautique
|
|
|
|
|
desertskier
Platinum Member

Joined: December-19-2006 Location: Az Status: Offline Points: 1114 |
Post Options
Thanks(0)
Quote Reply
Posted: October-23-2015 at 12:59pm |
|
I don't have a schematic for the EMS but I expect that the input at F is pulled up and when either switch detects a fault it is pulled to ground. The EMS can't tell which fault occurred, temp or oil pressure, but will go to limp mode for either. One of the ground connections is used when you connect G and B together. The ground at M is not used but if you want to connect them together it won't hurt. Also, I probably wouldn't use wire nuts for any of these connections.
edit: My mistake. I forgot the DUI doesn't need the ground wire. So yes you can remove them or just leave them clipped off. |
|
|
|
|
JPASS
Grand Poobah
Joined: June-17-2013 Location: Orlando Status: Offline Points: 2283 |
Post Options
Thanks(0)
Quote Reply
Posted: October-23-2015 at 1:02pm |
+1 Use heat shrink connectors for all of the connections being made. They're pretty cheap and readily available. |
|
|
'92 Correctcraft Ski Nautique
|
|
|
|
|
malcolm2
Senior Member
Joined: June-13-2010 Location: Nashville Status: Offline Points: 235 |
Post Options
Thanks(0)
Quote Reply
Posted: October-23-2015 at 1:08pm |
|
GRACIAS.
Thanks for the confirmation. |
|
|
|
|
Air206
Grand Poobah
Joined: September-28-2008 Location: Roanoke, VA Status: Offline Points: 3000 |
Post Options
Thanks(0)
Quote Reply
Posted: October-23-2015 at 1:40pm |
|
Getting Ready to do this swap, just ordered from Performance Distributors. - got red (red is always fast)
For the Barefoot, it's a Chevy 454......... Will Post Pics and variations. AWESOME write up! |
|
|
|
|
JoeinNY
Grand Poobah

Joined: October-19-2005 Location: United States Status: Offline Points: 5693 |
Post Options
Thanks(0)
Quote Reply
Posted: October-23-2015 at 1:42pm |
Good to hear, life is too short for ProTec issues |
|
|
|
|
Air206
Grand Poobah
Joined: September-28-2008 Location: Roanoke, VA Status: Offline Points: 3000 |
Post Options
Thanks(0)
Quote Reply
Posted: October-23-2015 at 2:05pm |
Need to do it - feel too responsible for my friends slaving over a crappy ignition system while I scratch my head and get the eye wash station ready........... 
|
|
|
|
|
desertskier
Platinum Member
Joined: December-19-2006 Location: Az Status: Offline Points: 1114 |
Post Options
Thanks(0)
Quote Reply
Posted: October-23-2015 at 2:25pm |
|
While installing the DUI I suggest that you read the voltage at P on the connector or at the 12.5 Amp breaker point 26 on the diagram. Per the DUI website it needs to be above 10.5Vdc while the engine is cranking for the DUI to operate correctly. I didn't mention this to JPASS when he installed his because I believe he had already beefed up his dash wiring so I assumed he was OK. If the voltage is below 10.5 then you will either need to beef up the dash wiring ( easy to do. positive side only not the grounds) or install a relay that switches the 12Vdc at the engine to the DUI and is controlled by the key switch voltage (which is what CC should have done in the first place for the Protec).
From DUI website: If all of your connections check out good, then check your battery voltage as you are cranking the engine. Since the DUI is a high performance ignition system it requires more voltage than a standard ignition system. If your battery voltage drops below 10.5 volts, this is not enough power to get the distributor to fire. This condition can be due to a weak or old battery or you are using a hot wire that has a resistor in line. Use a volt meter to test the hot wire while someone else cranks the engine over. If the voltage drops below 10.5, check your battery. To make sure it is not the hot wire, run a temporary jumper wire directly from the positive side of the battery to the distributor. If the distributor fires using the jumper wire, run a new hot wire from your switched 12 volt source to the distributor. |
|
|
|
|
malcolm2
Senior Member
Joined: June-13-2010 Location: Nashville Status: Offline Points: 235 |
Post Options
Thanks(0)
Quote Reply
Posted: October-23-2015 at 9:40pm |
|
OK, I am into this thing.... Took the pro-tec disty off and installed my new blue DUI. No one has mentioned that the water pipe and hose GET IN THE WAY.
I have install the new disty at a very similar angle as pictured above. The only adjustment I am going to have is distance between 2 posts at the water pipe. Have not tried to put the hose back on yet... The disty cap had to be removed to get the unit to seat fully into the block. any thoughts?  
|
|
|
|
|
JPASS
Grand Poobah
Joined: June-17-2013 Location: Orlando Status: Offline Points: 2283 |
Post Options
Thanks(0)
Quote Reply
Posted: October-23-2015 at 9:57pm |
|
Hmm. I never had any clearance issues with our '92. It was close, but there was plenty of room.
Is the dizzy set so the rotor is pointing to cylinder 1 at TDC? Take a pic looking down on the dizzy so we can see whats going on. |
|
|
'92 Correctcraft Ski Nautique
|
|
|
|
|
malcolm2
Senior Member
Joined: June-13-2010 Location: Nashville Status: Offline Points: 235 |
Post Options
Thanks(0)
Quote Reply
Posted: October-23-2015 at 10:07pm |
|
it may just end up being a tight squeeze. I am going to see if I can find a thinner walled hose tomorrow.
I did not mess with TDC yet, but I dropped the unit into the engine in a very similar orientation to the above pictures in a previous post. Protec is off, wires are cut and a few have been totally removed..... Then I got thirsty and called it quits for tonight. more photos tomorrow in the day light. Clark |
|
|
|
|
JPASS
Grand Poobah
Joined: June-17-2013 Location: Orlando Status: Offline Points: 2283 |
Post Options
Thanks(0)
Quote Reply
Posted: October-23-2015 at 10:10pm |
|
Here's some more shots of ours. It's close, but it fit.
    |
|
|
'92 Correctcraft Ski Nautique
|
|
|
|
|
KENO
Grand Poobah
Joined: June-06-2004 Location: United States Status: Online Points: 10638 |
Post Options
Thanks(0)
Quote Reply
Posted: October-23-2015 at 10:27pm |
|
Oddly enough, I can't remember what I had for supper tonight, but I do remember this issue coming up in the past.
Do a google search and type in Correctcraftfan intake manifold you'll find a post started by Dan in CT on June 4 2014 with some info on how one guy remedied his problem with a spacer between the thermostat housing and the intake manifold. I'd include a link to it, but it would probably take me about 3 weeks to make that happen KenO |
|
|
|
|
desertskier
Platinum Member
Joined: December-19-2006 Location: Az Status: Offline Points: 1114 |
Post Options
Thanks(0)
Quote Reply
Posted: October-23-2015 at 10:33pm |
|
|
|
KENO
Grand Poobah
Joined: June-06-2004 Location: United States Status: Online Points: 10638 |
Post Options
Thanks(0)
Quote Reply
Posted: October-23-2015 at 10:44pm |
|
Well look at that....... a link 6 minutes later
Thanks |
|
|
|
|
malcolm2
Senior Member
Joined: June-13-2010 Location: Nashville Status: Offline Points: 235 |
Post Options
Thanks(0)
Quote Reply
Posted: October-27-2015 at 2:41pm |
|
http://www.correctcraftfan.com/forum/forum_posts.asp?TID=37573&title=voltage-for-my-protec-swap
Link to further discussion on this subject. Specifically read the post I called GOTCHAS before you get too deep into this conversion. |
|
|
|
|
desertskier
Platinum Member
Joined: December-19-2006 Location: Az Status: Offline Points: 1114 |
Post Options
Thanks(0)
Quote Reply
Posted: October-28-2015 at 9:03pm |
|
Talking to another CC owner today he suggested that the oil and temp switch signals could still be used to activate the existing dash warning light/lights if you have them or whatever device you wanted to add. The limp mode function is gone so you have to turn the engine off yourself but an overtemp/low oil pressure warning led/horn or whatever you want to use might be nice. All you would need is a wire from the dash to the engine and connect it to F which goes to the switches. Then connect 12V to the other side of your device.
After thinking about this a little more you could also wire something up that kills the ignition signal and turns off the engine. |
|
|
|
|
michiel200
Senior Member

Joined: August-17-2009 Location: netherlands Status: Offline Points: 101 |
Post Options
Thanks(0)
Quote Reply
Posted: November-18-2015 at 5:36pm |
|
I bought a used D.I.U. distributor and spark plug wires on Ebay.
The seller sold his SN and switched the distributor and manifold for the old parts. Precaution on the ProTec on my '92 BFN with 5.8 HO. With the help of this very useful instruction I will do the swap this spring. The boat is in winter storage now. Many thanks for posting it!  
|
|
|
'92 BFN
|
|
|
|
|
Post Reply
|
Page 123> |
 Tweet
Tweet
|
| Forum Jump | Forum Permissions You cannot post new topics in this forum You cannot reply to topics in this forum You cannot delete your posts in this forum You cannot edit your posts in this forum You cannot create polls in this forum You cannot vote in polls in this forum |


 Topic Options
 KRoundy wrote: