 Boats For Sale:


1980 Ski Nautique Total Restoration |
Post Reply 
|
Page <1234 12> |
| Author | |
8122pbrainard 
Grand Poobah 

Joined: September-14-2006 Location: Three Lakes Wi. Status: Offline Points: 41040 |
 Post Options Post Options
") Thanks(1) Thanks(1)
 Quote Reply Quote Reply
 Posted: October-29-2013 at 8:21pm Posted: October-29-2013 at 8:21pm |
|
Don't forget the CPES! I agree, the work is looking great.

|
|
 |
|
|
Watauga
Senior Member 

Joined: June-12-2009 Location: United States Status: Offline Points: 208 |
Post Options
Thanks(0)
Quote Reply
Posted: October-29-2013 at 9:38pm |
|
Good reminder, 8122pbrainard. I already purchased the CPES, so I am ready.
|
|
|
|
|
gun-driver
Grand Poobah
Joined: July-18-2008 Location: Pittsburgh, Pa Status: Offline Points: 4112 |
Post Options
Thanks(0)
Quote Reply
Posted: October-30-2013 at 9:49am |
|
I always wondered why people tear out the floor and air box under the bow. There’s no wood up there and the foam is usually dry up front. I found it was cheaper (no glass/epoxy needed) and easier to stop at the kick board and just hollow the foam out to gain access for the vent hose.
When I did my ’85 (I know it’s too late now) I stopped at the kick board then cut the center out of the top of the air box to access the cables and vent hose, hollowed out all the foam and made a removable lid to seal it up but still allow access if I ever need to change a hose or whatever. One other thing I did was after I had all the stringers cut and fit I covered them with a layer of mat and a layer of cloth this way it was easier to work on and I had extra strength on the stringers before starting the stepped layup. Then sanded them with like 60 grit then installed into a thick bed of thickened epoxy mixed with milled fiber strands. That way you ensure that all gaps are filled and what squeezes out the side you mold as a fillet along the edge. Nice work so far keep chipping away at it. |
|
|
|
|
TRBenj
Grand Poobah

Joined: June-29-2005 Location: NWCT Status: Offline Points: 21107 |
Post Options
Thanks(0)
Quote Reply
Posted: October-30-2013 at 10:34am |
|
I have found wet foam all the way up at the nose. I dont like leaving any of the foam- especially the old stuff that absorbs water. It seems much more straightforward to form the air box from scratch rather than trying to leave it in place or reuse the old somehow... but thats just me.
On the boat that I did in the original style (glass over foam), it had the air box that spanned the entire width. After the floor and PVC pipes were in place, I poured the foam in several small batches, which allowed it to "grow" above floor level in front. I then trimmed it with a hand saw and angle grinder until it was in the proper shape, then glassed over it. On the boat that I rebuilt with coosa, I formed the side and front of the air box with the boards, then poured from the top until it was full... then trimmed the height and laid a board on top, then glassed over the whole thing. I think the latter approach using ply or similar would be fairly straightforward and would be my recommendation for this build. The ply will give your screws holding the carpeted panels in place something to bite to. |
|
|
|
|
gun-driver
Grand Poobah
Joined: July-18-2008 Location: Pittsburgh, Pa Status: Offline Points: 4112 |
Post Options
Thanks(0)
Quote Reply
Posted: October-30-2013 at 11:14am |
|
Tim I guess I didn't make it very clear that I pulled all the foam out from under the bow and out of the air box. I agree I wouldn't leave any of the old foam in. I meant for wet glass or rot theres no reason to tear out the floor and box.
Just seems that in my case and most it's a lot easier to leave the floor and box and clean out from underneath. |
|
|
|
|
Watauga
Senior Member
Joined: June-12-2009 Location: United States Status: Offline Points: 208 |
Post Options
Thanks(0)
Quote Reply
Posted: October-30-2013 at 11:28am |
|
I agree with TRBenj. If you look back through the pictures you will see discoloration on the hull below the air box and battery box locations. The foam was totally soaked, so much that the rot trail is still obvious after much grinding. The breach was the result of the combination of 3 things. 1-the failure of the dryer-vent style ventilation hose and, 2-The sucky non-sealed black pipe which carried the control-cables, wiring, and steering cable. 3- the failed battery boy drain line connection. When the bow dipped into a wake or wave the resulting wall of water could easily enter the bow mounted air intake, enter the deteriorated vent hoses and find its way to the foam. On this boat the black ABS type of pipe that was used as a conduit for the cables and wiring was cut and snapped over the wires rather than the wires and cabled threaded through it. Not to say anything of the missing elbow where the pipe made the transition down the downward angle towards the stern. The pipe was just cut and lapped together at that point. Instant water entrance point. Seems to me that if CC would have invested $50 of additional time and materials these boats wood structures would have lasted many more years.
Gun-runner: your method obviously worked for you-that's cool. I want the satisfaction of going all the way. And to insure the integrity of the bow lifting eve and bow ring. How did you replace the support leg that was attached to the right stringer? Do you have any pictures? Seems like if you only plowed a channel out that you would not be able to get the replacement stringer with attached leg back it there. |
|
|
|
|
gun-driver
Grand Poobah
Joined: July-18-2008 Location: Pittsburgh, Pa Status: Offline Points: 4112 |
Post Options
Thanks(0)
Quote Reply
Posted: October-30-2013 at 12:09pm |
|
I built a bulkhead across the front that attached the two stringers together and epoxied the remaining bow floor to the bulkhead.
  
|
|
|
|
|
Watauga
Senior Member
Joined: June-12-2009 Location: United States Status: Offline Points: 208 |
Post Options
Thanks(0)
Quote Reply
Posted: October-30-2013 at 2:40pm |
|
Nice work, Gun-Driver.
I read a post on this forum that identified the former CC employees as monkeys with chainsaws. I wouldn't go that far, but once you take one of these boats apart piece by piece and reveal how they were built it does make you wonder. I think the design was relatively good, but the production quality was substandard overall. Lots of cut corners, likely driven by production scheduals. I used to work with a carpenter whos building quality was inadequate. When challenged his response would normally be, "carpet will cover it". I think that is what was going on at CC back in those days. The finish was always good, but the underlying work has often inadequate. Having said all of that, I wouldn't consider another brand or type of boat. Still the Harley-Davidson of mid-engine tow boats. |
|
|
|
|
TRBenj
Grand Poobah
Joined: June-29-2005 Location: NWCT Status: Offline Points: 21107 |
Post Options
Thanks(0)
Quote Reply
Posted: October-30-2013 at 3:31pm |
Compared to what, might I ask? How many of the competition's boats have you dissected? I have seen some ugly pictures of x-brand ski boats that have been taken apart and its not pretty. You have to remember that these were boats built on a production line. They were largely hand made- it was a very labor intensive process, and it still is, compared to something like car manufacturing. Unfortunately, the same care that you can put into rebuilding the boat simply could not have been cost effective to do at the factory. The fact that theyre still quite solid 30 or 40 years later, despite the inevitable water intrusion and resulting rot, is pretty impressive. I suspect the factory didnt expect them to last that long, on average. How many cars that age are still on the road? As far as obvious "weak points" in the design or construction go, we now have the luxury of being able to see what worked and what didnt, after being subjected to 30-40 years of use. I agree with your assessment on what caused the water intrusion, but Im not sure saying that CC's were built with "substandard quality" is fair or accurate. |
|
|
|
|
Riley
Grand Poobah
Joined: January-19-2004 Location: Portland, ME Status: Offline Points: 7946 |
Post Options
Thanks(0)
Quote Reply
Posted: October-30-2013 at 3:56pm |
|
I think if anyone of us that's rebuilt old Correct Crafts pulled a new boat apart, they'd be full of ideas how the new boat could be made better. I pulled our 03 Malibu's coaming pads and back seat out when it was 2 years old to get at the gas tank, and wished that I'd ordered the boat incomplete so that I could have finished it.
|
|
|
|
|
Gary S
Grand Poobah

Joined: November-30-2006 Location: Illinois Status: Offline Points: 14096 |
Post Options
Thanks(0)
Quote Reply
Posted: October-30-2013 at 6:15pm |
|
I can understand where you are coming from but after a long time CC started to make money after alot of lean years. Money in the 80's was flowing like water and CC got to where they are today by cranking them out as best they could.There are boat companies that were big names and others you never heard of that failed since those times. Does the buyer of a 2014 Nautique care what happened 30 years ago? Doubtful. I believe that if you could afford one and took care of it, a new one would last until you didn't care. My point is at least they resolved those issues,many times it works the other way
|
|
|
|
|
Watauga
Senior Member
Joined: June-12-2009 Location: United States Status: Offline Points: 208 |
Post Options
Thanks(0)
Quote Reply
Posted: April-27-2014 at 9:09pm |
|
Tending to my Hurricane Sandy worksites, Moore Oklahoma worksite, new responses in Washington Il and now Oso Washington leaves no time to work on this boat. Good thing I am not in a hurry.
Got the top edges chamfered, the drain cut-out half circles cut and chamfered and the first coat of CPES brushed on. Hope to get another coat on tomorrow afternoon.  |
|
|
|
|
Watauga
Senior Member
Joined: June-12-2009 Location: United States Status: Offline Points: 208 |
Post Options
Thanks(0)
Quote Reply
Posted: April-27-2014 at 9:17pm |
 
|
|
|
|
|
Watauga
Senior Member
Joined: June-12-2009 Location: United States Status: Offline Points: 208 |
Post Options
Thanks(0)
Quote Reply
Posted: June-03-2014 at 12:06am |
|
Starting bedding in the primary stringers this weekend. Do you folks recommend installing all of the bulkheads and supports before beginning laying the mat?
  |
|
|
|
|
Gary S
Grand Poobah
Joined: November-30-2006 Location: Illinois Status: Offline Points: 14096 |
Post Options
Thanks(0)
Quote Reply
Posted: June-03-2014 at 12:33am |
|
nice workmanship!
|
|
|
|
|
TRBenj
Grand Poobah
Joined: June-29-2005 Location: NWCT Status: Offline Points: 21107 |
Post Options
Thanks(0)
Quote Reply
Posted: June-03-2014 at 9:23am |
No, definitely not. Stringers need to be fully glassed down first for structural reasons. It will also make the job a lot easier not having to work around any ribs yet. |
|
|
|
|
Watauga
Senior Member
Joined: June-12-2009 Location: United States Status: Offline Points: 208 |
Post Options
Thanks(0)
Quote Reply
Posted: June-03-2014 at 12:13pm |
|
Thanks, TRBenj. Therefore, I assume that you either fabricate the bulkheads and ribs to match the fillets created by the fiberglass mat, or use a die grinder to remove enough glass to allow the seating of the component all the way to the hull?
Another question. While investigating other rebuilds on this site I see that some rebuilders have chosen to use reduced sizes of PVC to replace the dryer-vent type of intake hoses. Has anyone (engineer types) actually completed a scientific analysis of the total CFM capacity of the intake hose vs the CFM capacity of the carburetors of the respective engines? I always tend to think of the intake hoses to supply air to evacuate potentially explosive fumes, but a major portion of the air being drawn in is used for combustion. It would be nice to know if reducing the capacity of the air supply is choking the engine. I think that an adequate exhaust/blower fan and motor enter into the equation as well? |
|
|
|
|
TRBenj
Grand Poobah
Joined: June-29-2005 Location: NWCT Status: Offline Points: 21107 |
Post Options
Thanks(0)
Quote Reply
Posted: June-03-2014 at 12:58pm |
|
Bulkheads and ribs should be shaped to fit against stringers with glass on them. I do not recommend grinding off the structural fiberglass in order to gain an easier fit- that is backwards logic.
I've used 2" hard PVC in place of 3" dryer hose on a Ski Tique (3 lines, 302ci) and 2.5" flex PVC in a Barefoot Nautique (3 lines, 454ci). Both boats run well in excess of their factory RPM and speed, and run no faster with the motorbox up (or off). They're not starving for air, so take that for what it's worth. Older boats only had 1-2 vents and I've seen several larger engines installed that run high rpm without starving. It's highly doubtful that CC engineered the Cfm of the vent hoses- just installed what they could fit- and it's overkill. I will say that the flex PVC is a lot easier to route and is worth the extra cost vs the hard stuff. |
|
|
|
|
Morfoot
Grand Poobah

Joined: February-06-2004 Location: South Lanier Status: Offline Points: 5311 |
Post Options
Thanks(0)
Quote Reply
Posted: June-03-2014 at 1:47pm |
I second that....Don't give an easier access point for water to reinvade because it will!. Fiberglass would rather bond to itself than something else. |
|
|
"Morfoot; He can ski. He can wakeboard.He can cook chicken.He can create his own self-named beverage, & can also apparently fly. A man of many talents."72 Mustang "Kermit",88 SN Miss Scarlett, 99 SN "Sherman"
|
|
|
|
|
Watauga
Senior Member
Joined: June-12-2009 Location: United States Status: Offline Points: 208 |
Post Options
Thanks(0)
Quote Reply
Posted: June-06-2014 at 11:05am |
|
Thanks, TRBenj & Morfoot. I will take your advice. I got the primaries bedded in and they look pretty good. They seem to be solid, therefore I am inclined to bed in the secondaries before I start glassing in the primaries. What do you think?
Jamestown back-ordered the 4" glass and will not ship until June 15th. I guess I could do the first 2" layer and wait for the 4", but I think I can go ahead now with bedding the secondaries and rough cut the ribs and bulkheads and begin figuring out the conduit placements. Another thing has become apparent. While I was bedding in the primaries I noticed the steering cable has a cracked outer plastic jacket in several places. I need to investigate replacing it, and probably the control cables as well while I am doing this. Don't want to try to snake the old cables out and snake new ones in later on. Really not complaining since they are 33 years old. |
|
|
|
|
Watauga
Senior Member
Joined: June-12-2009 Location: United States Status: Offline Points: 208 |
Post Options
Thanks(0)
Quote Reply
Posted: June-14-2014 at 6:26pm |
|
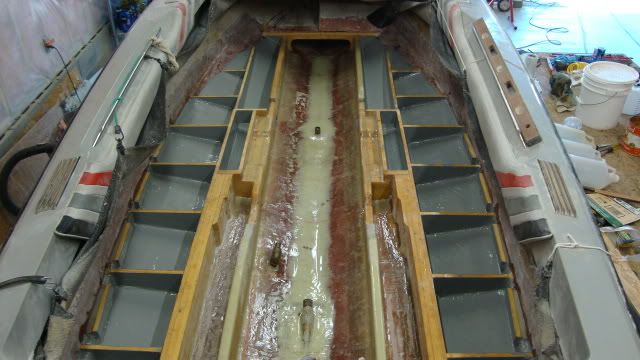
Got a couple hours in on the rebuild today. I decided to totally glass in the primaries before moving to the secondaries. Today I began that process by laying the 2" ribbon down both sides of each primary stringer.
My execution was a little wavy to begin with but progressively got better as I went along. I also was using too much resin to begin with but reduced the amount as I became more proficient. I have a few questions concerning the exhaust support block mounted inside the transom and also the boarding platform support blocks as well. Here is a picture of one of the exhaust support blocks I removed from the transom. It obviously was glassed in before the hole was drilled through the transom and subsequently through the support block. Therefore the hole in the plywood block was not glassed on the inside edge of the hole. When I removed it it did have some silicone sealant wiped around the exposed edge. The hole in the transom and the hole in the support block are both 3". I am wondering if I could drill the new hole in the support blocks at 3 1/4" rather than 3". By doing this in advance of glassing them in would allow me to apply at least one layer of glass over the exposed edge. What do you guys think? And finally, the exhaust flanges were screwed through the hull into the mounting blocks. It this still the preferred method or should I consider thru-bolts. How about the boarding/swim platform - screws or thru-bolts? |
|
|
|
|
Watauga
Senior Member
Joined: June-12-2009 Location: United States Status: Offline Points: 208 |
Post Options
Thanks(0)
Quote Reply
Posted: June-23-2014 at 10:58am |
|
Began bedding in the secondary stringers last evening and got the port side finished. Hope to do the starboard side tonight.
 
|
|
|
|
|
Watauga
Senior Member
Joined: June-12-2009 Location: United States Status: Offline Points: 208 |
Post Options
Thanks(0)
Quote Reply
Posted: June-29-2014 at 2:38pm |
|
I need some help. Yesterday I was fabricating a few of the structural components and once I made the auxilary stringers that will be sandwiched together and the bunk head they terminate into I realized there must me at least 1, maybe 2, additional bulkheads / ribs / braces, between the primary and secondary strings, forward of the one I just made. Take a look at the area within the red circle.
Does anyone have a picture or a diagram of the pieces I need? Mine were so rotten when I removed them, plus my memory is rather weak, that I can't figure it out. I know there were some additional components there. I have patterns made to help me in fabricating ribs from the secondary over to the sidewalls, so I don't need any help on those. Seems like they are supposed to be a wield shape that also supports the floor and capture the foam. 
|
|
|
|
|
uk1979
Platinum Member 
Joined: June-13-2007 Location: United Kingdom Status: Offline Points: 1410 |
Post Options
Thanks(0)
Quote Reply
Posted: June-30-2014 at 9:31am |
|
I found no additional bulkheads in that area marked just foam,if you add some may be good to keep them lower so you can add thickness to the underside of flooring panel for better seat fixing.

|
|
|
Lets have a go
56 Starflite 77 SN 78 SN 80 BFN |
|
|
|
|
Watauga
Senior Member
Joined: June-12-2009 Location: United States Status: Offline Points: 208 |
Post Options
Thanks(0)
Quote Reply
Posted: June-30-2014 at 2:23pm |
|
Thanks for the help, UK1979. It appears your SN is a few years older than mine. Yours obviously did not have the sculpted primaries that allow access to the motor mounts on the cradle...based on the picture above. The boats that were late in the series (with cradles) before the 2001s were introduced had some components there which provided some support for the floor, which was cantilevered towards the engine enough for the doghouse to rest, but also allow access to the motor mounts horizontal bolts.
I would really like to see a picture of a similar boat that underwent new stringer installation. |
|
|
|
|
uk1979
Platinum Member
Joined: June-13-2007 Location: United Kingdom Status: Offline Points: 1410 |
Post Options
Thanks(0)
Quote Reply
Posted: June-30-2014 at 3:15pm |
This may help it’s an 81 with cradle it looks like they just shaped the foam to the newer design and glassed over to make the floor just as the older ones... if you’re not using foam time to use your imagination. 
|
|
|
Lets have a go
56 Starflite 77 SN 78 SN 80 BFN |
|
|
|
|
Watauga
Senior Member
Joined: June-12-2009 Location: United States Status: Offline Points: 208 |
Post Options
Thanks(0)
Quote Reply
Posted: June-30-2014 at 5:50pm |
|
Thanks again UK1979. The picture you attached may be the only other 1981 on CCF that has been rebuilt that I have seen. It looks like it had been molested even before this picture was taken? Are those pool noodles? Wow.
I assume I am going to need to get creative, and build another couple of bulkheads/ribs/braces with a step down mini-stringer to hold the foam but allow access to the engine mounts and support the flooring adequately in this area. See the crude drawing below. The mini-bulkhead at the rear I have already fabricated, I just need to notch it out. The other 2 will need to be fabricated, one in the middle will also need the notch and the one forward will be un-notched. I will need to produce a mini stringer (in 2 pieces for each side) to hold the foam. All of that will need to be glassed over. What do you think? 
|
|
|
|
|
gun-driver
Grand Poobah
Joined: July-18-2008 Location: Pittsburgh, Pa Status: Offline Points: 4112 |
Post Options
Thanks(0)
Quote Reply
Posted: June-30-2014 at 6:05pm |
|
Hope this helps
|
|
|
|
|
Watauga
Senior Member
Joined: June-12-2009 Location: United States Status: Offline Points: 208 |
Post Options
Thanks(0)
Quote Reply
Posted: June-30-2014 at 6:46pm |
|
Thanks, gun-driver. That is very helpful and I will fabricate something similar on my boat. I wish someone would lead me toward a pre 2001 rebuild with a cradle, though.
I ready like the ribs you installed; I am going to do the same. I already have my patterns made. One question, you glassed in blocking along the sidewalls between the ribs. If you had to do over would you add them again? |
|
|
|
|
gun-driver
Grand Poobah
Joined: July-18-2008 Location: Pittsburgh, Pa Status: Offline Points: 4112 |
Post Options
Thanks(0)
Quote Reply
Posted: June-30-2014 at 9:21pm |
|
Yes.
That gave me more support and contact points for adhesion for the floor in between the ribs and also helped tie the floor to the wall, a weak spot on these boats. |
|
|
|
|
Post Reply
|
Page <1234 12> |
 Tweet
Tweet
|
| Forum Jump | Forum Permissions You cannot post new topics in this forum You cannot reply to topics in this forum You cannot delete your posts in this forum You cannot edit your posts in this forum You cannot create polls in this forum You cannot vote in polls in this forum |


 Topic Options
 Watauga wrote: