 Boats For Sale:


1980 Ski Nautique Total Restoration |
Post Reply 
|
Page <1 9101112> |
| Author | ||
Watauga 
Senior Member 

Joined: June-12-2009 Location: United States Status: Offline Points: 208 |
 Post Options Post Options
") Thanks(0) Thanks(0)
 Quote Reply Quote Reply
 Posted: April-10-2015 at 8:58pm Posted: April-10-2015 at 8:58pm |
|
|
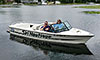
I towed her up to the lake and dropped her in. She started up fairly easy and I let her run at around 1,500 for 30 minutes. I am going to need to spend some time on linkage adjustments and tuning the carborator, but i am well pleased with what i am already seeing. I ordered a vacuum gauge from Amazon, but will not have it until Monday, and I am traveling next week anyway.
I am pretty pumped that she started and ran as well as she did considering every system on the boat was rebuilt at the same time, e.g., ignition, fuel delivery, electrical, controlls, etc. lots of opportunities to mess something up big time. I did not take her further than what you see in the pictures below, maybe tomorrow.    
|
||
 |
||
|
Watauga
Senior Member
Joined: June-12-2009 Location: United States Status: Offline Points: 208 |
Post Options
Thanks(0)
Quote Reply
Posted: April-10-2015 at 9:00pm |
|

|
||
|
||
|
fanofccfan
Platinum Member 

Joined: December-13-2009 Location: North Bend NE Status: Offline Points: 1720 |
Post Options
Thanks(0)
Quote Reply
Posted: April-10-2015 at 9:12pm |
|
|
That looks awesome on the water!
|
||
|
||
|
wataugasn84
Senior Member

Joined: January-06-2013 Location: East Tennessee Status: Offline Points: 118 |
Post Options
Thanks(0)
Quote Reply
Posted: April-11-2015 at 10:26am |
|
|
Arklie, boat looks great, congratulations of start up after build. I just got my interior back from upholster yesterday still have not brought boat home from storage I will share pic's when installed. just by the increased lake traffic on Watauga already I bet that will be the easiest put in at Fish Springs or any other dock for the year.I hope to See ya soon.
|
||
|
Watuugasn84
|
||
|
||
|
Fabcon
Gold Member
Joined: August-27-2012 Location: Buffalo. Mn Status: Offline Points: 552 |
Post Options
Thanks(0)
Quote Reply
Posted: April-11-2015 at 10:43am |
|
|
Very nice, great job
|
||
|
1976 Ski Nautique 351 Escort
1984 Barefoot Nautique (Parting Out) |
||
|
||
|
jimsport93
Platinum Member

Joined: February-20-2008 Location: Alpharetta Ga Status: Offline Points: 1749 |
Post Options
Thanks(0)
Quote Reply
Posted: April-11-2015 at 11:39am |
|
|
Fantastic work Arklie. Your boat looks great. Very impressive.
|
||
|
||
|
Morfoot
Grand Poobah 

Joined: February-06-2004 Location: South Lanier Status: Offline Points: 5310 |
Post Options
Thanks(0)
Quote Reply
Posted: April-11-2015 at 11:57am |
|
|
Can't wait to meet her.....Thanks for giving a classic a much needed facelift. Very Cool!

|
||
|
"Morfoot; He can ski. He can wakeboard.He can cook chicken.He can create his own self-named beverage, & can also apparently fly. A man of many talents."72 Mustang "Kermit",88 SN Miss Scarlett, 99 SN "Sherman"
|
||
|
||
|
Watauga
Senior Member
Joined: June-12-2009 Location: United States Status: Offline Points: 208 |
Post Options
Thanks(0)
Quote Reply
Posted: April-11-2015 at 10:37pm |
|
|
This pretty much concludes this threat. I will be updating my profile to include a link to this thread and creating an entry in the diaries section.
This was the beginning. Really didn't know what I was in for.  This is what I was in for. Grinding. Lots. Of. Grinding  Here is the result. Just some fine tuning left. First Startup. Thanks, everyone, for the help and advice. I will be making a contribution to the site for providing this awesome resource. Hopefully this thread will help someone else along the journey. |
||
|
||
|
skinaut
Senior Member

Joined: September-10-2008 Location: United States Status: Offline Points: 209 |
Post Options
Thanks(0)
Quote Reply
Posted: June-04-2015 at 1:26am |
|
|
Really enjoyed viewing this thread. Wonderful job! I will be looking for this boat next time to Watauga.
|
||
|
||
|
Smithfamily
Platinum Member

Joined: December-26-2007 Location: Orlando, Fl Status: Offline Points: 1602 |
Post Options
Thanks(0)
Quote Reply
Posted: June-04-2015 at 6:04am |
|
|
Looks like the "grind" paid off! She looks outstanding!! Over 5 years hard work! Enjoy it, .Good job!
|
||
|
Js
|
||
|
||
|
KRoundy
Platinum Member

Joined: August-23-2010 Location: Lake Stevens Status: Offline Points: 1702 |
Post Options
Thanks(0)
Quote Reply
Posted: June-05-2015 at 2:39am |
|
|
This thread is now part of the FAQ. Well done in every way!
|
||
|
Previous: 1993 Electric Blue/Charcoal Ski Nautique
Current: 2016 Ski Nautique 200 Open Bow |
||
|
||
|
DrStevens
Senior Member

Joined: October-15-2011 Location: Columbus, OH Status: Offline Points: 422 |
Post Options
Thanks(0)
Quote Reply
Posted: June-05-2015 at 8:23am |
|
|
Outstanding! Like the red interior.
|
||
|
||
|
jbear
Grand Poobah

Joined: January-21-2005 Location: Lake Wales FL. Status: Offline Points: 8193 |
Post Options
Thanks(0)
Quote Reply
Posted: June-05-2015 at 12:12pm |
|
|
thanks Arklie for sharing this all along the way. awesome job..awesome pics. hope you get to enjoy the fruits of all your labors.
john |
||
|
"Loud pipes save lives"
AdamT sez "I'm Canadian and a beaver lover myself"... |
||
|
||
|
Scotty O
Senior Member

Joined: August-18-2015 Location: NH Status: Offline Points: 138 |
Post Options
Thanks(0)
Quote Reply
Posted: August-18-2015 at 7:32pm |
|
|
Hi guys new to the forum and new to Ski Nautique with a 1980 as well. Question about the placement of your bilge pump in the boat. Wondering where the location is at? Mine is currently floating around in the bilge area and I don't see a specific point of where I am supposed to mount it too. Any help would be greatly appreciated!
|
||
|
||
|
Watauga
Senior Member
Joined: June-12-2009 Location: United States Status: Offline Points: 208 |
Post Options
Thanks(0)
Quote Reply
Posted: August-18-2015 at 7:44pm |
|
|
Hi Scottie,
On my '80 the bilge pump was originally screwed into a piece of plywood that glassed into the hull directly aft of the pylon. During the restoration process I ground all the fiberglass from that piece of plywood since it was rotten and removed it.. I simply used 4200 to reinstall the pump directly on the hull in the same place during the restoration, sans the plywood, which was not really needed. That was the good advice I received from some of the ole timers on this site, for which I am thankful. The original plywood mounting block, although it was bonded to the hull and encapsulated in fiberglass, was not really needed. The problem was that the pump mounting screws penetrated the fiberglass to reach the plywood but also presented a water entry point that developed rot. The other issue was that the plywood mounting block caused the position of the pump to be 3/4" higher, or greater, in the bilge and less likely to dry the bilge completely out when used. |
||
|
||
|
Watauga
Senior Member
Joined: June-12-2009 Location: United States Status: Offline Points: 208 |
Post Options
Thanks(0)
Quote Reply
Posted: August-18-2015 at 7:52pm |
|
 Here is the area where my pump was originally mounted. You can see that I ground the mounting block out . The area is forward of the drain and aft of the pylon. I assume CC gelcoated the hull, then installed the mounting block, then more gelcoat over the top. |
||
|
||
|
Scotty O
Senior Member
Joined: August-18-2015 Location: NH Status: Offline Points: 138 |
Post Options
Thanks(0)
Quote Reply
Posted: August-18-2015 at 7:52pm |
|
|
Have you had any issues since the competition on your resto? I'm not familiar with the 3M 4200 other than just looking it up now, but was wondering how your confidence is in that material keeping the pump in place for an extended period of time? Also how much of a pain is that going to be to remove the bilge pump in case of a failure?
|
||
|
||
|
Watauga
Senior Member
Joined: June-12-2009 Location: United States Status: Offline Points: 208 |
Post Options
Thanks(0)
Quote Reply
Posted: August-18-2015 at 7:59pm |
|
|
Scotty,
You wont have any problems removing it when you need to. Just go to Home Depot or Lowes, they have it and sometimes they have the quick set version as well. Sometimes they have the small squeeze tubes as well as the caulking-gun size cartridges. In the overall scheme of things related to a rebuild of one of these boats, fiddling with mounting a bilge pump is pretty insignificant. =) |
||
|
||
|
Scotty O
Senior Member
Joined: August-18-2015 Location: NH Status: Offline Points: 138 |
Post Options
Thanks(0)
Quote Reply
Posted: August-18-2015 at 8:05pm |
|
|
Great! Thank you so much for the advice!
What did you do on the trailer regarding a chain or winch? I was told by the previous owner that originally it came with a chain that you just latched the bow of the boat, I have seen that people have made modifications where they put a winch on. |
||
|
||
|
gR@HaM
Platinum Member

Joined: May-01-2012 Location: UK Status: Offline Points: 1265 |
Post Options
Thanks(0)
Quote Reply
Posted: August-19-2015 at 6:13am |
|
If you decide to use a winch get one with a strap, mine currently has a steel cable and its lethal!! |
||
|
'82 Ski Tique
|
||
|
||
|
Watauga
Senior Member
Joined: June-12-2009 Location: United States Status: Offline Points: 208 |
Post Options
Thanks(0)
Quote Reply
Posted: August-19-2015 at 9:20am |
|
|
If you look back through the posts on this thread you can see what I did as far as the coupler and the safety chains. I either ordered them from Amazon or e -trailer. Relative to a winch- I simply drilled and installed a forged eyebolt (not a cheap bent one) through the frame where the two siderails join the tongue, and I use a short quality ratchet strap between the bow eye on the boat and the eyebolt on the trailer. Pretty simple and low cost compared to some of the other options. I admit that a nice winch would be great. But this set up works well for me.
|
||
|
||
|
skinaut
Senior Member
Joined: September-10-2008 Location: United States Status: Offline Points: 209 |
Post Options
Thanks(0)
Quote Reply
Posted: August-19-2015 at 2:36pm |
|
|
Scotty O ,
if you have the CC trailer with the bow stops on it you really don't need a winch. That trailer is designed to be a drive on. There is a big eye bolt on the tongue and a turnbuckle with hooks on both ends is used to secure the boat to the trailer. You put the trailer in until the stern starts to float a little, unhook the turnbuckle from the bow eye and power off the trailer. To retrieve the boat put the trailer in till the water is just at the top of the fenders and genitally drive the boat till you make contact with the bunks get the boat straight with steering at idle then power it just enough to make contact with the bow stops. shut it off , hook the turnbuckle back up and do not tighten it yet. If you tighten it before chances are the stern will not settle down on the bunks and will be up in the air putting a lot of stress on the bow eye and turnbuckle. Once off the ramp stab your brakes to stop and the boat will shift forward onto the bow stops again, now hand tighten the turn buckle and your good to go. It really is easy to do and eliminates the all the stress of dragging the boat up with a wench. Wenches are an unnecessary PITA with the CC trailer. Hope this helps! |
||
|
||
|
a0128
Senior Member

Joined: May-05-2014 Location: Oregon Status: Offline Points: 226 |
Post Options
Thanks(0)
Quote Reply
Posted: August-19-2015 at 2:48pm |
|
This is true, unless you want to ski and all your buddies are busy. Then you need to have the Wench drive the boat. |
||
|
||
|
skinaut
Senior Member
Joined: September-10-2008 Location: United States Status: Offline Points: 209 |
Post Options
Thanks(0)
Quote Reply
Posted: August-19-2015 at 3:01pm |
|
|
Other trailers may need one but the 80's era CC trailers and boats are designed to do this. I have launched and retrieved my 86 many times by myself. Sure its easier to have some help but not necessary.. Please tell us how to ski alone, I am very interested.
|
||
|
||
|
dangerwil
Senior Member

Joined: June-20-2013 Location: Orange Park, FL Status: Offline Points: 319 |
Post Options
Thanks(0)
Quote Reply
Posted: August-19-2015 at 3:16pm |
|
|
||
|
skinaut
Senior Member
Joined: September-10-2008 Location: United States Status: Offline Points: 209 |
Post Options
Thanks(0)
Quote Reply
Posted: August-19-2015 at 3:25pm |
|
I re-read this and understand now. I digress ,Wenches can be a handy PITA, |
||
|
||
|
Scotty O
Senior Member
Joined: August-18-2015 Location: NH Status: Offline Points: 138 |
Post Options
Thanks(0)
Quote Reply
Posted: August-20-2015 at 1:04pm |
|
|
Watauga, got any more pics or info on your custom $150 home made boat lift? That looks pretty impressive!
|
||
|
||
|
Scotty O
Senior Member
Joined: August-18-2015 Location: NH Status: Offline Points: 138 |
Post Options
Thanks(0)
Quote Reply
Posted: August-20-2015 at 1:06pm |
|
|
Also, where did you find the rubber transition pieces for the flooring?
|
||
|
||
|
Watauga
Senior Member
Joined: June-12-2009 Location: United States Status: Offline Points: 208 |
Post Options
Thanks(0)
Quote Reply
Posted: August-24-2015 at 10:48am |
|
|
Scotty,
The trim is available from Christine's Marine and comes in 12' pieces. It is rolled up for shipping, but will straighten out fairly quickly on a sunny day by simply placing it on your driveway for a few minutes. Don't waste your time looking around for other places to purchase it or alternatives, just go with Christines. Carpet Trim It's the same trim that is used for the sidewall to floor transition as well if you are re carpeting the entire boat.. If you are re-carpeting the entire boat you will need to replace all the trim you will need 3 pieces. If you have the ski tray on the starboard side you will only need 2 pieces since the trim is only necessary forward of the ski tray. Lots of folks simply clean up the original trim with solvent and elbow grease and reuse. There are a number of ways to install the trim; I simply used 4200 to adhere it to the removable floor section and placed some weight on it overnight until it cured, then typical high quality carpet glue for the carpet. Did you lose a piece of the original trim? Thanks for asking about the DIY boat lift. I will put together a post on the lift soon. |
||
|
||
|
Scotty O
Senior Member
Joined: August-18-2015 Location: NH Status: Offline Points: 138 |
Post Options
Thanks(0)
Quote Reply
Posted: August-24-2015 at 11:11am |
|
|
Yes. My boat is missing that piece that runs the whole length of the port side. At some point in my boats life a (donkey) replaced the carpet with something that is not even remotely close to original. My boat's interior is blue and I do understand that the color is very unique with the blue and black in the carpet, but the material they used is not even the same shade of blue. My boat also does have the ski tray on the starboard side, but is way past rotten and will need to be replaced.
I unfortunately am finding out quickly this boat is not in the condition it was stated to have been and will probably have to go thru the reconstruction your boat had to. Secondary stringers are worse than the primary are but have found at least one bad spot in the primary starboard side. |
||
|
||
|
Post Reply
|
Page <1 9101112> |
 Tweet
Tweet
|
| Forum Jump | Forum Permissions You cannot post new topics in this forum You cannot reply to topics in this forum You cannot delete your posts in this forum You cannot edit your posts in this forum You cannot create polls in this forum You cannot vote in polls in this forum |


 Topic Options
 Scotty O wrote: